Tuesday, September 29, 2009
Branching out with Fabulous Flowers and Upsy Daisy
Trio of cards.... Branching out, Upsy Daisy and
Fabulous Flowers. Love the colors of Real Red,
Old Olive and Chocolate Chip colors. xoxo
Fabulous Flower Stamp set.....
Monday, September 28, 2009
MOJO Monday 106
Friday, September 25, 2009
Bucketful of Pumpkin Fun!
This cute pumpkin is quite large! check out the
picture below... it holds sooo many goodies!
The pattern is all over the internet right now.
It is made with three pillow box dies all put together.
If you don't have one, you will need one for this
project.
I found it on Splitcoast Stampers, this is my
version. The green vine is a very thin cut piece
of cardstock that I twisted around a pencil. xoxo
Thursday, September 24, 2009
Top Note Party Favor Boxes
Today's posts are four boxes I made with the SU! Big Shot
dies. I used the party favor box and two of the top note dies and
then cut a 1 inch strip x 9 for the handle. The box above is made
with the new very large snowman stamp called Simply Season Thanks
with the Bliss Blue, Certainly Celery and white cardstock. I took the
large chunky glitter to cover him so he looked a little vintage.
Mr Dracula is made with the same pieces except his eyes
are done with the 3/4 circle punch and the nose with the arrow
punch. The mouth is a candy piece you can buy by the pound
at top foods.
These two cuties are the new Build a Bear Dies!
Aren't they to die for! Hee Hee! Again I made
the boxes and then just punched out all the pieces
to put together these trick or treaters! Not much
to do as they decorate easy, you just pick the colors
for the outfits! If you don't have the dies to
make these and just need them! Email me! xoxo
Wednesday, September 23, 2009
Halloween Tins
Thses little tins I found at your local dollar spot.
On the two outer tins I have used the Spooky Treats
rub ons again to decorate them and the center one
is made by stampin the image on cardstock cutting
it out and adhering it to the tin. The stamp is from
the stamp set called From the Crypt from SU! xoxo
Monday, September 21, 2009
Just Chillin!
I'm just "chillin" today with the cool SU! rub ons
called Spooky Treats. I took the skeleton one
and first cut out the skull and rubbed it onto
white cardstock and cut it out. Then I took the
flourdelee and rubbed it onto pumpkin pie
cardstock and then attached the skull with a
dimensional. The one on the left is the new SU!
matchbox die and on the right is a halloween pin
I made with the same rub on. Sooo easy! I topped
it off with crystal effects to make it more permant.
Have a chillaxin day! xoxo
Saturday, September 19, 2009
Party Favor Die Box Altered
Today's post is the new SU! Party Favor
bag that I have altered. I cut out the box with the
new Christmas Cocoa paper, I then took basic gray cardstock
cut a piece 2 1/2 x 11 and ran it through the die at the
bottom of the box. Assemble it. Take the original box
and put adhesive strip around the bottom and slide it
into the new gray bottom that you just assembled.
I added the eyelet lace around the bottom. The handle
is made with the circle cutter and attached with the brads
and the rounder tab punch holds it all together. Add some
christmas candy sticks and a tag and it makes a pretty little
gift for that someone special. xoxo
Thursday, September 17, 2009
Wood Sheets!
Did you know Stampin Up sells Wood Sheets!
They are incrediable and very easy to use.
In this picture the basket, card and little pumpkin
are all made from the wood sheets. The stamp
image is stamped right on the wood, the pumpkin is
a punch I punched out of the wood and the basket is
just cut pieces put together! There are more samples
below that I have made for Christmas ideas too!
If you would like to order the Wood sheets email me,
you get 4 big sheets about 6 x 14' in size for $ 9.95!
Here is a close up of the basket, I found a tutorial online
on how to make the basket.
Here is a vintage SU! set that I stamped
on the wood with......
Here is the new Dasher stamped on
the wood sheet, the tag I punched
through the Big Shot...
Here is the Matchbox Die I punched
out of the wood, stamped it and added
a ornament holder to hang. The box
opens to reveal a gift or goodie.
I hope you enjoy these ideas! These wood
sheets are so fun and easy to use and the
ideas are endless! I will be playing with it
some more and will post more later. xoxo
Monday, September 14, 2009
Mojo Monday 104
Sunday, September 13, 2009
Giving thanks
The background in this card is made from embossing
envelope with pumpkins on it. The card has a slider
so that once the reciever opens it the lower half drops
down so that you can write a note. Colors used are Kiwi
Kiss, Pumpkin Pie, White. New Kiwi grosgrain ribbon.
I used the very large oval punch f9r the center, xoxo
Gift Card Holders
Had family birthdays yesterday... these are some
really cute gift card holders my friend Kirstin showed
me. You take a standard 5 1/2 par envelope, seal it,
fold it it half, cut it half. The prepare a piece of cardstock
4 3/4 x 7 5/8 score at 1 3/8 and 4 1/2. Add the front
piece of cardstock: bottom piece is 3 3/8 x 2 , middle piece is
3 1/8 x 1 3/4, and top piece is 2 7/8 x 1 1/2 , make sure you
only add addhesive to the bottom of the paper as the top needs
to be open to fold under. Then decorate. Here are a few other samples make
with the new DSP Christmas Cocoa. fom SU!
Attached the envelopes to the inside of holder
as shown in the photo. xoxo
Friday, September 11, 2009
Batty for Halloween!
Thursday, September 10, 2009
Halloween is Nearing....
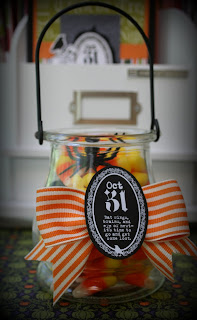
I recieved this cute lantern type jar from my dear
friend Kirstin over at www.papertreelane.com.
I just attached our cute pumpkin pie ribbon to it
and one of the Spooky Treats rub on on top of that.
Filled it with spiders and candy corn and Wah La!
Here it is close up! Get ready for lots of Halloween posts
as it is my favorite holiday next to Christmas! x0x0
Monday, September 7, 2009
Build a Bear Halloween Pop Up Card
Love this new Build A Bear Set from SU! Today's
cards is made with Pumpkin pie cardstock and
K & C Co Halloween stack since it matched SU!
Tasty Sweet set. Below is the pop up part of
the card......
I have used three of the bears and turned one into
a Ghost, a Pirate and Minnie Mouse. All clothes were
made from the clothes they are wearing on the stamps.
The pumpkin is KC Co..Here is a close up... xoxo
MOJO Monday 103
Friday, September 4, 2009
Paint Can Craft Holder
This was a fun and quick craft you can incorporate to
your stamp camps or classes. What I used are the
medium sized paint cans measuring 4 1/2 inches tall.
I covered them with cardstock, the paper shown is
"La Creme' by DCWV. Beautiful paper and goes well
with my craft room! Cut your cardstock 4 1/2 x 6 1/4
to fit around the can, then you will have to cut another
4 1/2 x 3 to cover the small part that won't reach.
Line up the cans as shown and added the very big
glue dots on all sides to attach. I added the bows
and the close up below shows the use of SU! pretties
kits with the pin and beads. Have fun making these!
You can put your scissors, rulers, adhesives anything
you need to reach for on your desk. xoxo