Tuesday, June 30, 2020

Bridal gifts and decor


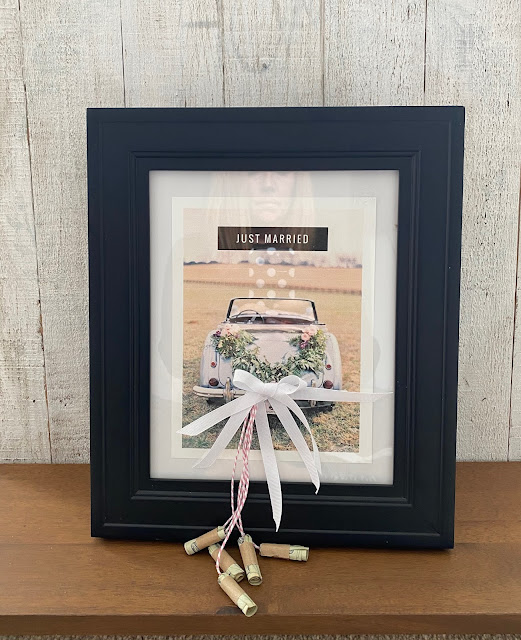
I've been making a few of these framed pieces
for upcoming wedding decor and bridal shower gifts.


I printed out this free image I found online
just using regular white card stock


I printed it out at 5 x 7" size
and framed it in a 8 x 10" frame


I used a grosgrain white ribbon and tied a bow
using glue dots to attach it to the glass,
that way when it is received as a gift they
can easily remove the ribbon and money.
YES! money!
They are attached like cans dragging behind the car!
I sure had fun putting this gift together for 
dear friends who will be married next month.
I am so missing the wedding/bridal season!


Sunday, June 28, 2020

Laundry room redo


We've envisioned this room's redo for over 18 months
and this month it finally happened.
(see pictures below for the before)
This room is the laundry room that had windows
across the south and west side that were old
aluminum ones that were sweating and icing
over in the winter months.
We really just had to keep the door closed at all times
as we lost all heat if the door was left open.


I started to think about how we could use this space to 
benefit using the extra 100 square feet.
The other side of the wall is an exterior door and our washer
and dryer. 
I ended up with a design and vision to make it a butler's pantry.
Running into a friend of mine last fall, he told me he could
transform the room for us. 
In meeting with him last winter I shared my vision
and I couldn't be happier with the results.
My husband and I have always done all our home 
projects ourselves but this one was way out of our
league with removing windows and rebuilding walls
and adding electricity.


I chose a white brick wall back splash and a quartz counter
that resembles concrete. I couldn't be happier with all the details
and aspects of the transformation


This is the other side of the space.
There was nothing above the washer and dryer.
Two cabinets were added as well as the two
floating shelves. Simple additions. 

And here is the before,
large windows across the room with wasted space....


I am very thankful that our friend at LNCC Designs
was able to make our vision come true especially during 
the times we are in. 


Friday, June 26, 2020

Mini Starbuck's Cups


I wanted to share today the adorable playroom and playhouse one of my customer's sent me.
In my Etsy's shop I have these mini Starbuck's cup for sale,
She purchased two and sent me off this photo to show me
what she was doing with the cups.
Look closely in the photo on the ledge of the playhouse,
two little cups sitting right there.
But seriously,  how cute and amazing is this space?
She sure did an amazing job putting this room 
all together!
Great job Megan!


Monday, June 22, 2020

Box of Sunshine


Here's an alternative for this month's Paper Pumpkin....
I used the pears from this month's kit to create these cards.
Below is the Box of Sunshine
You get 8 cards total two of each designs,
plus an added sheet of stickers to place on a box
of sunshine to send someone to brighten their day!


Using the wood grain embossing folder,
I was able to make the background of the card easily
and just by adding the white paper with wood grain
gave the card that much needed outdoor element.


I took and used a stampin write maker to go around the outside
of the pear to add some more color and depth.
 Add the pears and the little tag and you ready to go. 

Do you subscribe to Paper Pumpkin?
It's a fun creative monthly box you receive in the mail
complete with everything you need to make the theme
of the box for that month!
Great way to try something new and get creative all at once.

Saturday, June 20, 2020

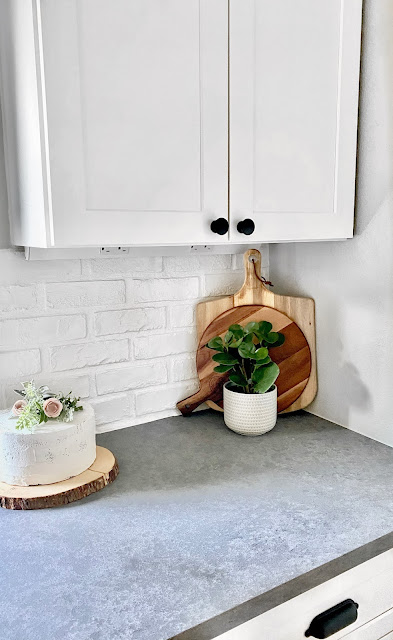
Diy Faux Cake


Diy Faux Cake
Now here's one you can sink your teeth into!
Seriously, if you are looking for a fun and easy diy
this is it, and the best part of it is there are no calories involved!


To start this project you want to purchase a styrofoam round,
the one I used is a 8" round.  I purchased mine at Michael's for $6.99.  You can also use smaller rounds that are 1" high that you can hot glue together.  They have them at the Dollar Tree and it would take 3 of those to create the height of a tall cake.


Using any color of brown and a sponge brush
paint your cake!


You don't have to worry about covering it 
perfectly as you will be "frosting" it shortly 


After it dries you get to go onto the next and most
fun part of the project.
Frosting your cake!


I purchased the vinyl spackling instead of the 
light weight type as it's creamier and less dry
than the light weight ones. 
Spreads just like real
frosting.
While I was frosting the cake I started craving
a piece of cake!  Good thing I had some chocolate on hand!


This was so fun to do!


Here it is all dry.
I added just ONE coat of the spackling
Moving on to the last step, decorating 
your cake.  You can use leaves or flowers.
I made these little pale pink roses out of 
paper  and the greens are a pick I had bought
a few years ago. 
Look through what you have, even pretty leaves 
would look great!


I hope you give this a try!
And if you do,  send me off a picture of it!
Happy creating!


Thursday, June 18, 2020

White Picket Fence


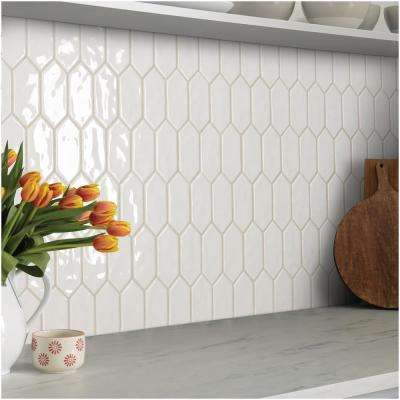
I had my eye on this White Picket Fence tile by 
Marazzi for months. 
We were so lucky that a friend of ours was able to install
this for us.


The tile runs about 3" high and comes in sheets
of 11" x 12" making covering your area very affordable.


The grout I choose is called Snow White, it's 
not a bright white but somewhat off white.


We just covered the back splash area just
behind the stove which elongated the look
of the counter and area.
Fresh new look, no more spaghetti sauce spots on the wall!

You can find this tile at Home Depot
It's called white picket fence tile by Marazzi

LuxeCraft 11 in. x 12 in. x 6.35mm White Ceramic Picket Mosaic Wall Tile (0.73 sq. ft. / piece)

Tuesday, June 16, 2020

Fire Pit Makeover


Take a look at this fire pit makeover!
My sister was moving and had no need for her
fire pit.  
Once she left it for me and I took the cover off I immediately saw
the rust damage on the tabletop.
I did a little research on how I could fix this.
I ended up sanding it and was going to add what is called
Bondo, a product used in car repair for metal that has rusted.
Once I sanded the table top, the blemish was flushed to the 
rest of the table, so I didn't have to Bondo it.


Here it is all completed!!
I was going for a natural element look, concrete.


I ended up sanding, then priming, then putting on two coats
of Rustoleum Stone textured gray tone.


I also painted the base which use to be brown.
I love the result of this spray paint, 
it really does give it a concrete look!
I'll take it!


It's always a fun challenge for me to try and redo
items that need just a little attention.
The results are amazing!

Sunday, June 14, 2020

Framed Moss


This.  love this.
So the other day I had to venture to the dentist due to a receding 
gum line that was exposing my tooth root.
Sounds fun huh?
Upon entering the office there this was......
in all it's glory
The details are amazing and the two tone moss gives it
that natural outdoor vibe.
I feel a diy coming on......
This wouldn't be too hard to make....
May try and figure out this piece of art!

Friday, June 12, 2020

Rainbow Love

]

Spreading more rainbow love today with another 
card made with the rainbow stamp  from last month's 
paper pumpkin kit.
This time I used a more subtle muted colors
to create the rainbow.


The card stock for the base of the card is Roco Rose 
I added some sequins around the rainbow to give
it a little sparkle.
Putting a little sparkle in your weekend!
Enjoy!

Thursday, June 11, 2020

Spread Love


Spreading a little love with these rainbow love cards.
This rainbow is from this past month's paper pumpkin 
which is so cheery to me in a rather unsettling time.


This is the simplest card, 
The base is Melon Mambo and the scalloped
circle is cut from the Granny apple green cardstock.
The center circle is whisper white.


For the rainbow,
I used Melon Mambo
Mango Melody
Granny Apple Green

Happy creating!


Monday, June 8, 2020

Diy Window Grids


It's been full weekends for us trying to keep busy
working on projects and remaining social distancing.
This one was a fun update.
We painted the outside of our windows black, even 
the screens.  Once painted, because our window grids are in 
between the window glass you have one of two choices to
cover the the grids.
And both techniques can be done inside or outside.
I started with the outdoor double doors and a window.


I chose first to try the least expensive way to cover
the grids by using,,,,,  wait for it.....
professional grade black electrical tape.
Yes,  you read that right!
electrical tape!


It easily covers the widow grid just perfectly , 
but if you are looking closely you wouldn't know it's electrical tape.
In the photo above, you can only see the white of the grid if you are looking down into the window, but looking straight on as you see in the picture below of the door I did, you cannot see it.
Below you can see on the left where I put the black electrical tape
and on the right the original white grids. 
Once seeing them side by side I decided that I wanted to 
keep the white grids!
After all the work on the one window!
But, what I decided was that with the house
being white and the grids in the windows being white
is that it looks really nice as a good contrast. 

So, if you think or decide you want to do this either
inside or out here is the electrical tape to use.
The other technique that is more professional are the 
grids below.


You can purchased these window grid kits on Amazon or
right at newpanes.com .  They have a great video showing you how
easy it is to add the plastic grids to your window.
Now remember,  you would use these if your panes are INSIDE
of the glass of your windows.
Hope this information has helped if you decide to try this.
I really thought I wanted my windows all black, and I am 
glad I checked into it to find out how it would look.
Always sharing to give you ideas and thoughts for your home.