Sunday, January 31, 2010
Small Wonder
Here is one of those very LARGE Hershey candy bars that I have covered with pretty in pink cards stock and used the new roller wheel called I {love} Love in chocolate (of course) and then added the real red ribbon. The heart in the middle is a playing card if you can believe it! I mounted it atop the chocolate chip cardstock and then stamped one of our hearts from the I {heart} Hearts set. Fun and easy! xoxo
Saturday, January 30, 2010
Valentine Candy Bouquet
This morning Shaelyn and I got up and decided to make these candy bouquets for her
teacher that I have had on my mind for a long time. They are very inexspensive to make,
don't you just LOVE that! You will see in the photo below what you need to start with but
I also forgot to include a package of red cellophane so add that to your list. Have fun creating!
So as you can see you will need bamboo sticks, a vase ( dollar store), M &M"s, 6 Hershey bars
and a pkg of cello paper ( dollar store). I started by taping the candy bars to the bamboo sticks then
moved on to cutting the cello paper into 8 inch squares and taking the bamboo sticks punching
in the center of the square to push the paper to the top of the stick, ( see photo below) I then took floral
tape and started at the top of the stick as you can see in photo and wrap it to make it adhere
to the cello paper and stick. This goes quite quickly. Then fill your jar with the M & M's
tie a bow of your choice. I took out my Big Shot and vinyl and cut three hearts out of the
vinyl to put on the front of the vase. When that is complete you will arrange all the sticks
with candy and cello paper right into the vase. I took one last stick and stamped
a heart with the new SU! set called Sweetheart and attached it to the stick with tape
and put that dead center. It cost me $7.00 to make this cute bouquet. I hope I
have inspired you! Let me know if you have questions. I am going to try in the
near future, when I am not crafting to fiqure out how to do videos for you all!
Have a fun and chillaxin weekend! xoxo
Friday, January 29, 2010
Simple Simon card!
Happy Friday my blogging friends! My favorite day of the week!
The card I have posted today is what I call a simple simon card!
You can make a ton of these quick and easy, just change out the stamps
to customize the occassion. The cardstock colors are tempting tourquoise,
rose red, certainly celery and pretty in pink. The ribbon is pretty in pink too, although
in the picture looks cream. I used the blender pens to color the cake and added glitter.
The stamp sets used are from the Occasions Mini and Sale a Bration catties.
Have a great weekend! xoxo
Thursday, January 28, 2010
3 x 3 Card Holder with cards
Here is another project to do for your stamp camps using the sets from the Occasions Mini cattie.
This holder measures at 3 x 12' then scored at 2 3/4, then 3 3/4, then 4' then 2 1/2. After
you are done fold it all up and take the Big Shot, use the Finial Press envelope and emboss
just both ends of the so saffron cardstock. Your 3x 3 envelopes will fit at the top and the finished
cards will fill up the bottom.. The cards are cut 3 x 3 and decorated with the stamp sets from the
Occasions Mini Fox and Friends and Picture This. The cardstock used is the Soft Suede, So Saffron,
and Bashful Blue. xoxo
Wednesday, January 27, 2010
Vellum candy treat bag
Today's bag is made with SU! die Bag w/ Scallops. It took
the vellum cardstock and ran it throught the Big Shot and put
together. I then filled it with red candies. The cardstock are the
new "In colors" Melon Mambo, and Bermuda Bay, the button
are the cordouroy summer sun buttons. The ribbon is the pretty
Melon Mambo. The the bag is fastened with the Jumbo Eyelets.
The stamp set is from the Occasions Mini I {Heart} Hearts. xoxo
Tuesday, January 26, 2010
Valentine Bracelet Treats
Here is what you need to get started.....
 Today's post are some really easy Valentine braclet treats for stamps camps, kid camps, the classroom parties or crafting. These heart tins I have had laying around and decided I needed to do something with them. They can be found at any local craft outlet. The candy bracelets come in a bag of 20 for $1.50, very inexspensive for camps and such. I used the Sending Love Speciality DSP and cut it 1/4' x 12 and used the Tombow adhesive to attached to the tin. I then added irridescent grass inside and then laid the bracelet on top of the grass. I did not want to decorate the tin anymore than I did or you couldn't see the cute heart in the center.
 Here is a side view......
Monday, January 25, 2010
Mojo Monday 123
Valentine Heart Suckers

Good Morning Ladies and Gents too! Boy I tell
you! I love all your enthusiasm! I love receiving
your emails of thanks and motivation! I have
received an abundance of emails asking if I am
coming up with any ideas for Valentine's,
oooohhh the pressure ladies! Well, today's post
might curb your appetites. (hopefully!)
As you can see I am also messing around with my
blog design right now. I think it is a bit too busy
so I am under construction the next few days
trying out different looks. Feel free to give me
your input! Now on to the post!
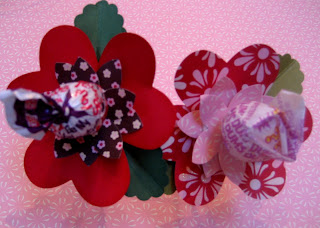
This little sucker is made with your punches.
It incorporates the 5 petal punch, the large heart
punch and the scallop oval punch and one small
sucker. Here are a few views and then instructions
below.

Here's the under side. And below is how they
look upright.

Below are the pieces you need to make these
cardstock. Take your 1/8 punch and punch
small holes in all pieces so that you can slide
them easily onto the sucker.
Start with the 5 petal punched flowers first, then
the 3 hearts. I did add adhesive to the ends of the
hearts right around the punched hole to hold them in
place. Then last the petals. I don't know that you
can see in the photo but I did take a sponge dauber
to the petal and leaves and shaded them.
Now you are done! How easy it that! xoxo
Saturday, January 23, 2010
Sweet Pea Scallop Box

together on this box on wednesday. She
came up with the box (she is amazing at
creating dimiensions that require measurements!
something I totally struggle with! Anywho she
came up with this box to fit the Square Die for
the Big Shot. The meaurements are a 8 1/2
x 8 1/2 sheet of cardstock scored at 2' on each
side, BUT she created a tab at the back for the
hinge that is 1/4 of an inch to attach the lid to.
The top and bottom of the box have the square
die attached with sticky strip. The top is designed
with the Sweet Pea DSP paper. The closure is
SU! clear buttons that I have covered with DSP,
and then added another botton on top and threaded
the two together with twinnings and tied a bow.
The hinge itself it the tag punch folded in half to
fold behind the button (great idea Kirstin!)
The box itself is large as you can see in the photo
above. Have fun creating this weekend! xoxo
Friday, January 22, 2010
Valentine Milkcarton
Thursday, January 21, 2010
Kleenex Valentine

These little kleenex holders are so sweet,
you could make these up for teachers, kiddos,
stamp camps or classes. They are very easy to
do. The measurements are 4 1/4 x 8 1/2, then
score at 2 1/2, 3/4 from the 2 1/2, then 5 1/4
then 6 1/2. Once done at the end when you
scored the 6 1/2 you will go to the corner on
each side and measure to the center to the
end of the piece of paper to cut the slants.
The stamp used is the roller wheel I love you
and the new large heart punch an the stitched
wide grosgrain red ribbon wrapped from back
to front but not over the heart so it can be opened.
Once done you wrap them around the small packages
of kleenex.
Let me know if you have questions.xoxo


Wednesday, January 20, 2010
Sweet Pink Valentine

and easy! I thought this might be good for a
upcoming class especially for Sale A Bration. It
promotes alot right out of the Occasions Mini.
The cardstock is pretty in pink, the DSP is the
Sendning Love Speciality (yes again! Love It)
The new scallop trim border punch and the new
large heart punch. Our beautiful pretty in pink
grosgrain ribbon. The center heart I punched
out three times and layered it for the 3D look
and added some dazzling diamonds. xoxo
Tuesday, January 19, 2010
Some more Scrapitizers
Monday, January 18, 2010
Mojo Monday 122
Saturday, January 16, 2010
We Be Stampers Group Meeting

What a great day we all had! Our upline
Leader Denise Jorgensen put on a informative
and creative day for us! Here are a few of the
cards that were traded and were put into a card
contest. Thank you Denise!


Tammy Mullins from Orting suprised me with
these darling vintage cards for fun! Thank you
again Tammy! These just make me smile :)

which I believe you were able to purchase from
Leadership was the prize with the new stencil.
Leadership was the prize with the new stencil.
I was lucky enough to win second place with
my Owl Pencil card.
This card made first place, there was no
name on the back!

And this card made 3rd place........
Karen Wollman from Clearview who presented
Sweet Treats and Heart Treat Cups.
She did an awesome job!
life of me get the pictures to rotate but here
they are...

Butterfly card.....

Sweet Treet Heart cups......
card. on the other side is a treat cup
with one little chocolate chip cookie
in it. very cute Karen!
has the frog catching flies that she
used the slot punch to make! Yes
all those flies are made from the
slot punch! Cute Cute!!
presented Clear Mount Stamps
I love them and were pleased to see them
be demonstrated by Kristi!


