Saturday, May 30, 2020

Pateros


I spent the last few days in Pateros a quaint little town just past
Chelan Washington.
I went to do a remodel of a bathroom countertop for my girlfriend's home.  While there we took breaks and walked the river walk there.
The colors and the spectacular backdrops were just stunning.
Here are a few pictures of what I saw on my walks.


So serene.....


This was a walk we did up a hill that looked over the river
as sunset.


This is looking up river from town.
I felt so much peace and calm being here.
If you haven't ventured there it is a must!

Wednesday, May 27, 2020

Hey there


Hey there friends!
Just another sample of a cute and easy card you can make or use for your stamp kits this month.
It's the cute rainbow from this month's Paper Pumpkin,
so if you received the kit then you have the stamp set
from the kit


I chose three light subtle colors to create the rainbow
and just stamped the "hey"
How easy is this!
And if you still have not subscribed to Paper Pumpkin
you can jump on board any time.
It's a monthly subscription that arrives in your mailbox
with everything you need to create what's inside.
Come check it out!
Click HERE

Saturday, May 23, 2020

Well, Hello


Well, Hello friends!
How about trying a new technique?
Do you have a big shot?
How about framelits?
If you have both of these then you can make
one of these cute sentiments.


Starting with your framelit, a piece of cardstock, a pencil
and scissors.  Start by tracing your framelit onto the
black cardstock.  Once traced cut out with your scissors.


Now using your same framelit and your Big Shot,
cut out the framelit in white cardstock


If you have never used a Big Shot this is how the 
image looks once it's cut out.  Just takes a minute to
roll it through the Big Shot and get this result.


Now taking the white piece of "hello" and some glue
attach it to the black piece of cardstock,
Look at the result!   
Now attach it to your card!
That's it!


I used pop up dimensionals to make the Hello raised
to give it a pop. 
I hope this inspires you go give this a try!


Thursday, May 21, 2020

A Kit of Color


And here is the last post of these cute little cards
that I created from the Paper Pumpkin May kit
It's always fun to try alternative ideas with
what's in the kit.


This card is just made with all the pieces
included in the kit I just added the birthday
sentiment.


For both of these cards I used the 
striped paper that is in the kit and cut away
the sides of it to use as a rainbow and added the
cloud.  Using a black maker I dotted the cloud
around the edge. 


Same with this card except I added the "for you"
The colors in the cards are so bright and happy,
I hope this inspires you to create some happy
right now!


Tuesday, May 19, 2020

Rainbow Love


Hey!
Hello there! 
Here's a few more ideas from the A kit of Color
Paper Pumpkin this month.
As always I love to make alternative cards for you
to try.  


I cut up the base of one of the designs of the cards, cutting
it at 2 1/2".  The cloud comes in the kit so I just hand drew the 
face on the front and used the tip of a pencil dipped in ink
to make the cheeks.


I searched through my stamp sets to find 
a stamp that said something about smiling and
found this one from a past Paper Pumpkin.
You could use any stamp, like hello, smile
hi, etc. 
This kit is so versatile and cute!
You can still sign up for Paper Pumpkin
and receive next month's kit by
clicking HERE
Come join the creative fun!


Sunday, May 17, 2020

Paper Pumpkin's Box of Sunshine


                                              Hey friends!
      This month's Paper Pumpkin is here and it is filled with color!
                               It's also called " A kit in Color"   

                               https://scontent-sea1-1.xx.fbcdn.net/v/t1.0-0/p75x225/94203533_2572679756323224_3242270597002035200_o.jpg?_nc_cat=109&_nc_sid=9267fe&_nc_ohc=SnAfMm1n77EAX-sL0VN&_nc_ht=scontent-sea1-1.xx&_nc_tp=6&oh=84f2102c27ac71dd54bab1839efd7352&oe=5EE73EF2


      The May kit is all about the color and rainbows which are
                       popping up everywhere right now.
There are 12 cards 4 of each design and as you guessed it, I made some alternative designs for you to try.  As always you can follow the kit to a tee and there are colorful instructions and they guide you through each step,  OR you can get creative on your own and make what you want with them!   Me being the creative,  I like to change things up.   Here is just one of the simple designs I have to share with you.....


This one is pretty easy to recreate.
All I have done is used the card base in the kit and the
cute rainbow image.  I cut the jagged ridge off the top
of the rainbow image, adhered it in place.
Then using the stamp set in the kit I stamped and embossed the word HEY in white embossing powder on black cardstock.


I fussy cut out the word HEY and attached it to the front.
There you have it!
Doesn't get any easier than that my friends, and look how cute this card is!


Right now is such a great time to sign up for Paper Pumpkin,
so many of us are trying to keep busy and try new things during this
"stay at home order".   The kits can be ordered for any duration you choose, one month, three, six or more!  You pick and you can cancel them at anytime. 

You can subscribe HERE

I am going to tease you with next month's 
Box of Sunshine so you can see all that are
in these gorgeous kits.
Check out below, and for you that are
subscribers, here's a look into what's coming
to your mailbox!


Friday, May 15, 2020

Card Kits


Happy friday!
Offering up the last of these two kits
If you are looking for something creative to do then these kits
are for you!
They are all prepared and ready to assemble!
Just order and I will mail them off to you
You can choose between the two different kits,
in the kits you will receive 3 of each designs for a total
of 12 cards for $20
Just email me your preference
@ juliepitta@rocketmail.com


Now onto some fun!
There are a few new tea towels in
my Etsy shop!
Go take a look!
2340 West Newton  HERE


New towel;
Do mimosas count as a juice cleanse?
or 
"Wash your hands, Mom said so!"

Wednesday, May 13, 2020

Strawberry-Rhubarb Jam


Good morning!
I have an abundance of rhubarb in the garden now so I thought
it would be great idea to make some refrigerator jam.
This jam does not require you to boil jars as most
traditional canning methods do.
You can make this jam and put into your favorite container
and it will last up to 3-4 weeks in the frig.
Also, this recipe yeilds just 16 oz of jam
so you may want to double it as I did.


The recipe just has a few ingredients
Strawberries -12 oz
Rhubarb - 6 oz
Orange juice - 1/4 c
Maple Syrup - 1/3 c
Ginger - (fresh) 1 T
Chia seeds - 1 1/2 T

Start by cutting up your fruit into small size pieces.
I prefer to not have chunky jam, so if you prefer your jam
with fruit chunks then chop larger pieces.
Put fruit, juice, maple syrup and ginger into pan and
bring to a boil on med heat.  Let cook stirring regularly.
Once cooked down, remove from heat and add your chia
seeds.  Return to low heat for 5 mins.  The chia seeds will
thicken your jam.  Once it thickens after 5 mins remove
from heat let cool and spoon into your container.
That's it!!!
How easy is that!!!


Here it is all jar and ready to devour!
So delish!!!!
I hope you try this recipe, as you can see there is 
no sugar involved, but your maple syrup will give
it that sweet you need to cut the heavy rhubarb bitterness
as well as the ginger giving it a pop!
Grab some toast.......

Monday, May 11, 2020

Mini Starbuck's cups


Have you seen the cute little Starbuck's cups offered
in my Etsy shop?
They are so adorable and come with the cute little red 
straw.
I get asked this question often in the shop;
can use drink from them?
Yes!
Like any disposable cup it is a one time use
and can hold hot or cold drinks.
You can also open the lid and add candie
inside and attach a coffee card to it.


Another thing I hear my customers have
used it for is there kiddos first year photo
shoot where their child is holding the cup!
So cute!
If you are looking for a cute favor or gift 
head over to the shop to check out these
little cuties!

Saturday, May 9, 2020

Diy Jars


Happy weekend friends!
Last post I shared with you what I do with jars
that I save from using with my cooking.
A lot of times you will find it hard to scrape off all of the label from
the jars.  This post will give you an easy way to do this and it 
will remove all of the sticky gooey glue too!


First soak in hot water your jars for about 15 mins,
this will allow the labels to soften and most of the
paper will just peel away.


Then you are left with this, above, the glue and sticky stuff


Here's where the magic comes in,
using equal parts of Dawn liquid soap and baking soda
create a paste by mixing the two together.


It will look like this above....


Using your fingers, spread the paste over the glue and sticky
residue on the jars and let sit for about 10 mins.


Using the scouring side of the sponge scrub away the residue


And there you have it!  nice and clean, ready to diy
and add flowers to gift a friend!


This is my previous post showing how I added some twine and ribbon to the jars to make them look cute.  
I love how they turned out!


I hope you will give this a try!
Have a wonderful weekend!

Thursday, May 7, 2020

Diy Vases


Happy thursday friends!
How is everyone doing out there?
Keeping busy? We just had our lockdown extended
through the end of May so each day besides work, 
I find things to keep me busy that I can share with you!
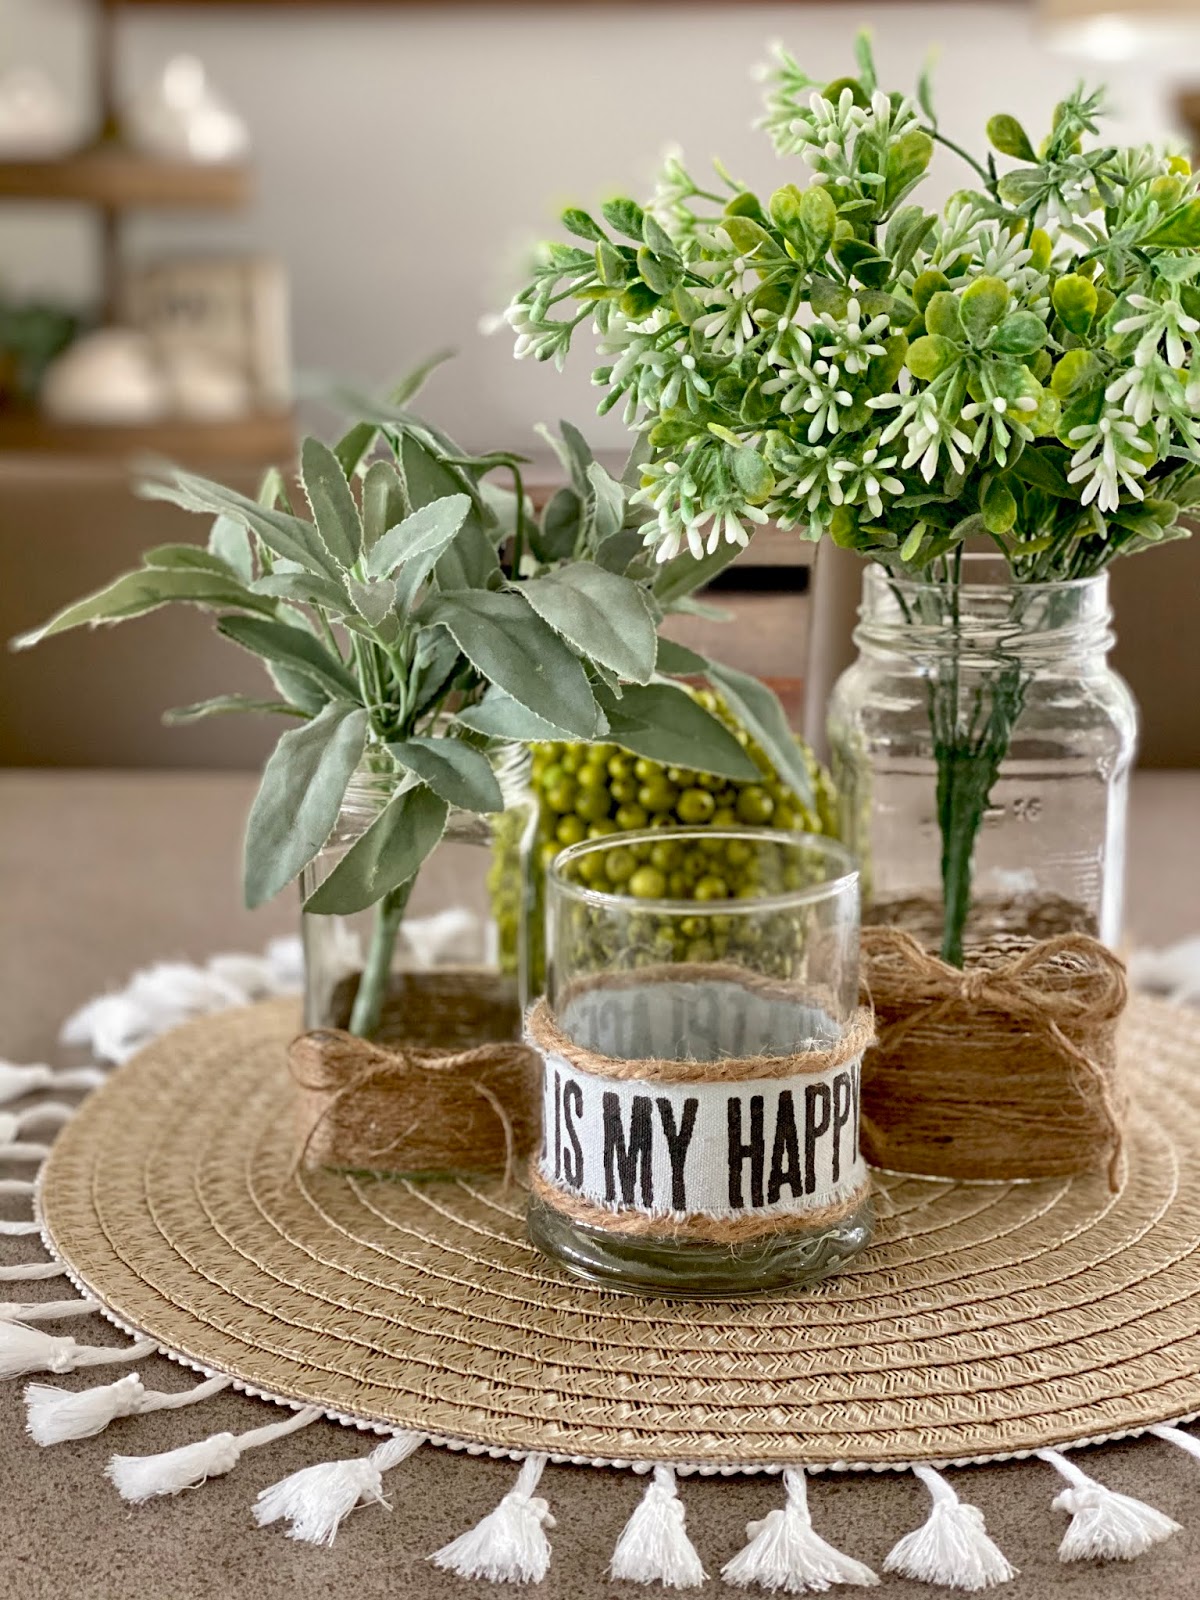
I started with these jars below that I have been saving
to share with you.....


Now that it's spring and things are starting to bloom
in my garden,
I love to take flowers to people
(literally a long lost gesture)
But as I cleaned the jars I thought about how I could 
add a little something to them. 
(Watch for the next post, I will show you how to easily 
clean off the glass jars, label and glue...)

So, back to the jars,
clean them off and dry them off.
I used twinning and a ribbon and glue for this project. 


I used what's called Tombow liquid adhesive,
but you could try using a hot glue gun
the only thing using the glue gun it's hard
to control the amount of glue you put on the glass, sometimes
the intention is to use a little amount, but it comes
out quick and thick which doesn't look good.


So using a sponge brush, sponge the glue on 2/3 of the
way up the jar.  staring from the bottom start wrapping
the twine around and around til you are at the desired
height up the jar.
When you are all done tie yourself a bow and add to the front of the jar. 


For the jar with the ribbon I started with the first
row just wrapping one row of twine then I added
the ribbon, then the top row the twine. 
That easy!


I made these vases up to have on hand for once all my flowers in
my garden start to bloom I will have some cute vases to
fill with flowers and gift to someone.
I hope you give them a try!
Stay tuned for the next post where I 
show you how to clean the jars.