Thursday, September 30, 2010

Gettin' Punchy today!

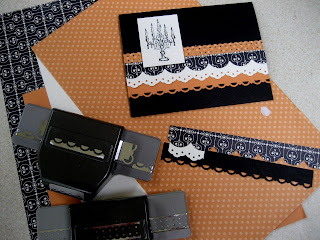
Wow!  It's already thursday and the last day of September! Where did this month go?  Flew right by without fanfare I tell you!  Now onto my fav,  October!  or I should say ROCKTOBER!  cause it rocks Halloween! Obviously my fav with all my posts lately.  We I decided to get out the punches today for a quick easy card you too can make.  The chandelier is from the ever present stamp set on my blog called Dark and Dreary.  Can't get enough of the set,  it is so versatile.  For eample this card could be for Halloween or not!   I used the new Bling Rhinestones on the Chandelier to jazz it up a bit.   

Cardstock:  Pumpkin pie, basic black, pumpkin  pie DSP,  newsprint DSP
Punches:  Scallop Trim  #118402, Eyelet Border #119853, Dotted Scallop Ribbon # 119275
Stamp Set:  Dark and Dreary  #120837 Wood or #121151 Clear\
Rhinestones #119246 
xoxo

Tuesday, September 28, 2010

Halloween Lollipop Box

Hi Stampers!  Today's post is just so cute!  I received this pattern from Jenny Moors over at
http://stampingmoments.blogspot.com/ .      She has some really great things she's made!
This is one of them.  When you go to view her blog they are under "spring lollipops", I just chose to
do them in Halloween theme. I apologize for the retired DSP but my new DSP hasn't arrived yet so I improvised with this.  The stamp sets used are Dark and Dreary and Batty for You.  The cardstock is the new concord crush, pumpkin pie and transparancy for the window.  The handle is being held together with the new pumpkin pie glitzzy brads.  The scallop punch and 1 1/4 and 1 3/8 circle punches for the lollipop covers.   So stinkin cute!Thank you Jenny for sharing this with me!  xoxo

Here it is opened and closer up.  I found the lollipops at Rite Aid, full bag for 99 cents!  Woot!

Sunday, September 26, 2010

Spiderman meets T-Swift!


This is my darling almost 16yr old that just keeps me in stitches!  Here she is in her regular "attire".  She constantly has these glasses on and it just cracks me up! as well as peacock feathers in her hair and strummin her quitar.
I think she's emulating her favorite Taylor Swift....  love it!


She also LOVES Spiderman!  So when I saw these  here  I knew I had to case them!
There's nothing like having a teenager who likes all this Super Hero stufff! xoxo

Friday, September 24, 2010

Decor Elements Halloween Jars

Here's another fun quick idea for use with your Decor Elements Spooky Things. This is the set of vinyl I showed
earlier this week.  I started with a set of glass jars I picked up at Ross Dress for Less, all 3 for $6.99!  What a deal!. 
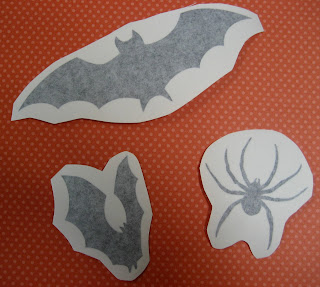
These are the decor elements cut out of the sheet from the Spooky Things


I added the decor elements to the glass jars and then filled them with Halloween candies.  Here is another idea below  I used the designer series papers  and cut the paper to fit the inside of the jears for some color.

Here they are up close......

Don't have the Spooky Things Decor Elements?  You can order them on the toolbar to the right by clicking shop with me online button.  xoxo

Thursday, September 23, 2010

Matching card for Fancy Favor Box

Today's card matches yesterday fancy favor boxes. It's the same recipe as yesterdays except I added the salutation from the Dark and Dreary set.   xoxo

Wednesday, September 22, 2010

Halloween Fancy Favor Box


So I know, these aren't the size of the Fancy Favor box die.... That's right!  they are extended!  You can make them taller by adding cardstock to the top of the box before you assemble them!  Both these boxes are the Fancy Favor box die. 

This first one I cut from the die the black cardstock and added 2 1/2 inches to the top.  When you do this you will want to use the sticky strip to hold it well together.  I made the damask looking cardstock by using the stamp from 24/7 and just stamped it all over   I took the new silver crepe paper from our Holiday mini catalog,  First put a piece of the sticky strip down,  take the crepe and scrunch it up as you move along from one side to the other.  I added two rows of the pumpkin pie grosgrain ribbon to the center and took out the new Bat punch.  Punched it out of white cardstock and added the chunky silver glitter to it.   The closure is the new pumpkin  pie buttons and the new antique brad. 

For this box I cut the white cardstock out of the fancy favor box and stamp it with the flourish stamp from 24/7.  The top I added  1 3/4' of black cardstock.  The center is the new glizzty brads.  xoxo

Monday, September 20, 2010

Rolo Candy Pencils


Hi ya'll!  It's almost Fall!   My favorite time of year!  Today's post is a quick little Back to school/teacher gift idea.   My girlfriend Susan ( a serious blogger!) told me about these.  I haven't seen any, but thought I should give it a whirl.   As you can see in my photo somebody in my house got into the rolo stash!  No one is fessing up to it,  but I think it was the hubby.  Anywho.... these are very easy to make and cost near to nothing.  Take your standard size of rolo candies.  I have cut a piece of more mustard cardstock sized at 3 x 3 5/8' and wrap it around the rolo and adhere with sticky strip.  Then cut a piece of cajun craze cardstock at 1' x 3' and attach it to the top to look like a pencil eraser.  Then cut a 1/4' piece of silver metallic cardstock, run it through the corrugator and wrap at base of eraser.  At the top of the eraser cut a 1' circle and use a glue dot to attach to the top. Take a hershey kiss and attach at the bottom for your pencil lead.  And there you have it!  Now,   I would love you guys to send me yours all done, so I can post them.  Let's see your creativity!  xoxo

Saturday, September 18, 2010

More Dark and Dreary.....


Well.... I told you there was more Dark and Dreary to share.....

This one is pear pizzaz, black and very vanilla
This one concord crush, pear pizzaz, very vanilla.
can is filled with black licorce.

Friday, September 17, 2010

Decor Elements Halloween Centerpiece

Here's what we are making today... Couple days back I posted the Spooky Things Decor Elements,  I have used the "Oct 31st"" on the front of this centerpiece. Most of the items I will show you were purchased at the Dollar Tree, so this project is very inexpensive to make,  I maybe spent $8.00.

Here's what you will need:
Decor Elements Spooky Things Vinyl
5 of the little flower pots shown above.
Bag of candy corn
1 cylinder candle
 1 cylinder glass vase
The tray I set this centerpiece in I had laying around the house....

Start by putting the long skinny candle inside of the glass cylinder.\
Then take your bag of candy corn and slowly put the candy down the sides of the glass, once that is done you will need to either buy or rummage through your cupboards to find a larger glass vase to now set this one in.  Once you find one you will take your vinyl  "Oct 31st" and apply it to the glass vase. 
Should look like this......
Now put this onto a plate or tray of your choice and arrange the fall flower pots around it.  You can refer to my photo to see the final look above.  Here it is up close as well....
Hope I have inspired you and you have fun making a fall centerpiece!  xoxo

Wednesday, September 15, 2010

Halloween Witch's Shoes


Aren't these spooktacular!  I made these little witches shoes by using plain ole' basic black cardstock.  The flower on the front of the shoe is the large 2' scallop punch,  it has been punched out 5 times. twice in the pumpkin pie dsp and 3 times in the concord crush.  I used one of the concord crush glittzy brads to hold them all together, then just took my fingers and scrunched each of them leaving the bottom one untouched.  It was attached to the shoes with tombow adhesive glue.   The strap also has a glittzy brad holding it together.
   
Here it is with treats tucked inside the sole.  I used two quaker mini granola bars (trying to think healthy), they were both wrapped in the pumpkin pie and concord crush dsp.. You could use any Halloween type candy as well.  Candy corn, mini candy bars,  I know you guys will think of something!  xoxo    

YOU CAN PURCHASE THE PATTERN ON MY HOME PAGE UNDER TUTORIALS FOR $2.50
and it will be sent to you....... 

Monday, September 13, 2010

Dark and Dreary Luminaries


I told you I have more Dark and Dreary to share!  Here are three luminaries I have made out of the the XL Fancy Favor die #115965 - $39.95, that is compatiable with the Big Shot.  I cut out the centers by using the 1 1/4 square punch.  The boxes have been stamped with the stamp Sanded #109294 - $17.95 and then distressed with the sponge daubers ##102892 - $10.95 for 12,   with the ink color Soft Suede.  Above they are lit up with the small battery operated candles. 


Here they are not lit,  I used the Dark and Dreary set as well as the new Spider Web embossing folder for the first one.  All are stamped with classic basic black ink on 3 x 3 piece of vellum cardstock. 
  Hauntingly fun!  xoxo  

Saturday, September 11, 2010

Decor Elements- Spooky Things

 
This is Stampin Up! new Halloween Vinyl called Spooky Things.  It is a very large sheet 7' x 7 1/4'  with all the images you see here for $ 14.95 in either black or dark gray.  I will be showing you quite a few things in the next week I have made with them.  The first is this evening.  I have taken two different window frames
that can be purchased at any craft store or local frame shop. 


This first one is made by cutting a piece of 3' very vanilla cardstock, then a 2' pumpkin pie cardstock, attach it to the vanilla, lastly cut a 6' piece of Newsprint DSP and attach all three pieces together.  Add the new Raven lace trim to the pumpkin pie piece.  (Raven tirm # 120988 $5.95).   When all put together add your trick or treat vinyl.  You now will attach the picture you created to the back of the frame.  


For the Happy Halloween frame use a 6' x 8' inch piece of the Tangerine Tango DSP paper, before putting this one together I cut a 2' circle in  Pear Pizzaz and attached it on the underside of the vinyl AFTER attaching it to the FRONT of the frame.  Different than how I attached the first one.  xoxo  Hope you have frun making these!  You can order any items you need to the right of the sidebar. Muu wahhhhhh Halloween is near!!!  xoxo  

Thursday, September 9, 2010

Dark and Dreary.....

Dark and Dreary set coupled with the new jumbo roller wheel Midnight musings.
Recipe:
Midnight musing wheel # 120863  - $8.50
Dark and Dreary stamp set 
Wood: # 120837  -  $19.95
Clear # 121151  -  $14.95
Very Vanilla cardstock #  101650
Pumpkin Pie cardstock # 105117
NEW! Black 1/2' lace trim # 120988 - $5.95


At least that's how are weather is feeling here!  very dark and dreary!  I have been working on some cards and things with the Dark and Dreary set.  I will post throughout the week...  lots more to show for Halloween! xoxo

Tuesday, September 7, 2010

Halloween Wine and Beer Labels

Good Morning!  I hope everyone had a great Labor day weekend!   Today's post is a cute idea for Halloween.  I have used sticker paper that can be found at your local craft store for this project.  I have used the Kraft  color.  You will want to use black staz on ink for the stamping as it is permanent and the sticker paper has a slight sheen to it.    Recipe below


Here are two wine bottles and one beer covered with the labels, aren't they sooo cool!  

Here they are up close for you to see,  I used the sponge daubers in soft suede around the edges of the labels to give it that aged, scary look!

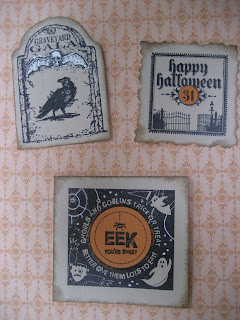
These are the three label before attaching.  I have used three different sets for this project to show you that any Halloween set will work.   Again I stamped in black staz on ink, aged the edges with a sponge dauber in soft suede.  Restamped the images in black on the pumpkin pie cardstock and cut it out and glue it right to the label,  The skeleton on the top left was stamped on white in black and cut out and attached. Remove the store labels from your bottles by soaking them in water for 15 mintues.
Once you are done stamping peel the backing off and attach to the bottles.  The ribbon on the beer bottle is the pumpkin pie grosgrain, the ribbon on the wine bottles were purchased at a carft store.  (sorry I couldn't help myself!  I loved the ribbon!)  This is a very fun, cheap and easy project for your stamp camps, clubs or classes as well as fun craft for Halloween party gifts.   Hope you like it, let me know what you think!     

Halloween Wine Label Recipe:

1 8 1/2 x 10 sheet of kraft sticker paper
black staz on ink - #101406
sponge daubers - #102892
pumpkin pie cardstock  -  #105117
whisper white cardstock  # - 100730
Stamps Sets:  Dark and Dreary - #120837
Graveyard Gala #  115458
Sweet Centers # 116 521  

All items can be ordered from my SU! webiste by clicking on the order online box to the right.  Have fun creating these and send me your photos so I can post them on my blog!  xoxo

Saturday, September 4, 2010

Downline gift.....

So one of my downline gals Kirstin Davies just celebrated her 5th year with SU!  can I hear a wooo hooo!  Bet you didn't know we sold jewerly now too!  Well we do and it is called "Simply Adorned"  It can be found in the photo above and in the catalog on page 189.  The prices are very reasonable, and the bracelets and necklaces are of great quality.  I LOVE them!  So for my downlines gift she will be receiving one of our pretty bracelets and a square charm for her to attach to it.  I wrapped it all up for her above and added a chipboard five to commerate her celebration!  (Hope she hasn't log on here! )  Congrats Kirstin!  xoxo

Friday, September 3, 2010

Ribbon Shares - Finally!

Ok so the designer paper shares are done,  if you did not get one and still would like a pack email me at juliepitta@rocketmail.com I have two left.  Again you receive 82 sheets of the new DSP paper from our new
catalog. This is a pack of ALL of the styles of paper!
So here goes with the Ribbon shares,  I am choosing a few of the ribbon favorites if I get a good response then I will add more as there are alot of new ribbons to include.  Here goes:

1 1/4 Striped Grosgrain Ribbon - 1 yard of each color!

$20.00 for mail out with priority mail
Includes: daffodil delight, pumpkin pie, pretty in pink, real red, rich razzleberry, night of navy, marina mist,certainly celery, old olive, early espresso, basic black. This is the yery wide stripped ribbon on page 191of the 2010-11 Catalog.

5/8 Satin Ribbon - 3 yards of each color!

$30.00 for mail out with priority mail
Includes:  White, Vanilla, Daffodil delight, pumpkin, pretty in pink, real red, rich razzleberry, night of navy, marina mist, celery old olive, early espresso and black.

3/8 Taffeta Ribbon-  2 1/2 yards of each color!

$30.00 for mail out proirity mail.
Includes: White, Vanilla, Daffodil delight, pumpkin, pretty in pink, real red, rich razzleberry, night of navy, marina mist, celery old olive, early espresso and black.

1/2 Poly stitiched ribbon in the "In colors" NEW!  5 yards of each!

$20.00 for mail out priority mail
Includes: White, Vanilla, Daffodil delight, pumpkin, pretty in pink, real red, rich razzleberry, night of navy, marina mist, celery old olive, early espresso and black.


You may order one or more of any of the above sets.  Just email me which ribbon you would like and I will send you a payapl invoice statement for your payment.  www.juliepitta@rocketmail.com
Let me know if you have any questions

Thursday, September 2, 2010


You are going to see alot of Halloween ideas and cards coming your way.  It is by far my very best favorite holiday next to Christmas.  This card is made with the new DSP paper packets.  This one is the "In color" packet.  The paper is the new rich Concord Crush, perfect for halloween colors.  The witches shoes are made by using  the top note die run through the Big Shot.  After you run it through you then cut it in half the long way.  Then take your 3/4 circle punch and punch the first hole then right next to it punch the 1 1/4 punch. That gives you the shoe.  The buckles are made by cutting out small sqaures and useing the slot punch in the center. The little spider is one of our new glimmer brads in black and drawn on legs.
So fun and easy!  xoxo

Wednesday, September 1, 2010

The Holiday Mini is Here!

It is here!  The Stampin  Up!  Holiday Mini! which means you can now view it and order to yours hearts content!  You can click Here to view the catalog.  You are going to just LOVE all the new products.

You mean the World 2 me


Good wednesday morning!  Today is the day you can order from the new Holiday 2010-11 Mini catalog!  Did I hear a big wooohooo!  I will be posting later this afternoon for you to view and of course order from!  The card of the day is a bit more masculine than I usually stamp but figured it was about time I push the envelope.  The paper is the new DSP Newsprint.   I accompanied it with the bashful blue and basic black.   The map I colored in by using the dauber (little fingers sponges)  in bashful blue, blushing bride and delightful daffodil ink.  The stamp is from the Word play stamp set # 120308.  I hand cut the ribbon piece from black cardstock and added the antique brad.  I think it looks like a compass somewhat.   xoxo