Tuesday, November 30, 2010

Elf on a Shelf- A Family Tradition

Good Morning!  I wanted to share a fun family tradition you can start with your families.  My girlfriend Susan told me about this and thought it would be fun to share.  It turns out that there is a book and elf you can find at your local malls or online but when I went to search for it I found the elf to look a little "scary" !  for me   I wanted a cute elf.  So off to Target I went and found this cutie for $3.99.  I added some ink to his face for cheeks and sprayed him with glitter.  You can see the "real" elf on the shef" in a picture below...
Anywho here's how it works:

The Elf on the Shelf children's book written by the mother/daughter team of Carol V. Aebersold and Chanda A. Bell is a wonderful tradition to start with your children. The book tells the story of a secret elf who comes to stay with your family for Christmas to keep an eye out for naughty or nice behavior..
Bring the book and the elf out around Thanksgiving and read the story to your children or grandchildren and introduce the elf to them. You will be asked by the book to name the elf. After you finish that you can go the elfontheshelf.com and register your elf's new adopted name.

The book tells the story of an elf that Santa has sent to keep an eye on the children's behavior. Each night the elf uses his magic to go back the north pole and give a report, when he comes home each night he finds a new hiding place in the house, so use your creativity when finding new and unique hiding places for him. It is fun to watch the kids race around each morning to find his new location.

Explain to kids that each year after Christmas the elf will return to the North Pole to help Santa get ready for the next year's Christmas so that you can pack him away until next year, though he could make periodic checkup throughout the year to ensure good behavior.

Isn't this a fun little thing to keep those little ones behaviors in check!  Our elf came to visit two days ago and keeps showing up all over the house!  Have fun  with this!  xoxo

Here's the real mccoy, vintagy but not cute enough! maybe that's what he's suppose to do!  Scare the kids into being good!  Ha hahahaa!  

Monday, November 29, 2010

Tile Necklaces


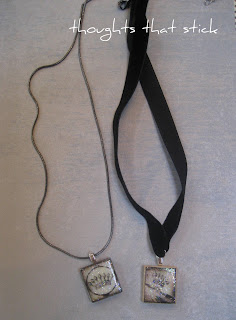
So here are the other necklaces I have been working on. These are made with scrabble tiles!  The images I just found online and cut them to fit the tile, used some basic black ink and sponged the edges then added crystal effects to it and added a little dazzling diamond glitter and let dry.  Once dry you add the jewelry bail to the back of the tile with a little dot of crystal effects. I chose a velvet chain for the one necklace and then  a snake type chain for the other.

The one on the right is hard to see but it is a really cute bird with a crown on it's head....

Sunday, November 28, 2010

Snowflake Lane and Botanical Gardens

Spent the evening at Bellevue's Snowflake lane.  . It’s a nightly display along the sidewalks of Bellevue Way and NE 8th Street of dazzling lights, music, dramatic drumming from live toy soldiers and magical snow that falls from the sky!  And it's complimentary!  All the better!
We also went over to the Botanical gardens....

The enormously popular Garden d’Lights festival features over ½ million lights which transform the Bellevue Botanical Gardens into a blossoming winter wonderland.  This is a must see for the holiday,  this used to be complimentary but have changed to charging an admission this year.  $5.00 for adults and kids 10 and under free.  You will love this!  xoxo

Saturday, November 27, 2010

Bottle Cap Necklaces

Here's what were making today!  Bottle cap necklaces!  Here's what you need:
Crystal Effects, Designer paper, bottle caps, metallic spray paint, dazzling diamond glitter, ribbon for necklaces, (I used the SU! 1/2' Lace black trim and the little bead chain necklace.  (can be found at local craft store.  So here they are:

The first is made by taking the bottle cap and lightly spraying the back side only with metallic silver or flat silver spray paint.  Let dry. When dry take a 1/8' punch and punch a hole in the top of bottle cap for your jump hoop to go thru.  Punch hole and add the jump hoop. Take your designer series paper, I used the Candy Cane Christmas.  Use a 1 3/4 circle punch and then glue to the inside of the bottle cap.  Take the crystal effects, (don't have any?  you can order it right from my site to the left.)  squirt just enough to cover the inside of cap, then shake a little giltter in the center and let dry, drys in 20 minutes but I like to wait on hour.  Add your bead chain.

This next one the steps are the same but a few changes since I want this to be for an adult rather than little kiddo.  I used a jewelry bail on the bottle cap that I attached at the back with the crystal effects.  You want to use just a little of the crystal effects as you don't want the glue all goobery.  (is that a word?!) anywho... the image I just found online it's a lttle bird and chandelier.  Love it! I added the lace trim as the necklance.  I tied a few knots throughtout the necklace strand as well.   Here are a few more pictures. 


Have fun trying these, they are quite easy.  Stayed tuned for the next day or so I will be posting some other necklaces I have been making too.  Lots of fun Christmas gift ideas!  Have a great weekend!  xoxo


Thursday, November 25, 2010

Happy Thanksgiving!


    May your stuffing be tasty
                                                           May your turkey plump,
                                                        May your potatoes and gravy
                                                               Have nary a lump
                                                        May your yams be delicious
                                                        And your pies take the prize,
                                                     And may your Thanksgiving dinner
                                                             Stay off your thighs!
                                                Have a wonderful Thanksgiving everyone!

Tuesday, November 23, 2010

Cookie Exchange Tins

So today we are snowed in!  Not because the snow accumalated but the temps dropped and now all roads are covered in ice.  The kids have been playing outside and decided to write out Christmas lists. Here's what I have been working on.  I always buy the mega can of dishwashing tablet cans at Costco and save them lids and all.  I used the SU!  DSP called Deck the Halls.  It takes 2 sheets of 12 x 12 to cover these cans, they are very large.  Perfect to hold your cookies for a cookie exchange.  I used all the new goodies in the mini catalog as well.  There are a few up close pictures for you to see,  I just did minimal decorating.


So I mentioned that the girls wrote out their Christmas lists... well I am not suppose to show you Shelby's but Shaelyn's just made us giggle.  Take a look......

I just love the innocence of little girls,  so Shae has on her list that she would like "close'  which is clothes! and further down she says sikiney jeans,  I hope I can find sik a nini jeans somewhere!  (skinny jeans) and last on the list  she says "slipers"  I was laughing!  where will I find slip-ers!  so stinkin cute!  xoxo

Monday, November 22, 2010

Vintage Santa Mini Scrapbooks

I know, I know you are tired of seeing this Santa!  But I LOVE him and have been using him alot for gift making and such.  Today's post is a cute little 3 1/2 x 4 1/2 mini 20 page scrapbook.  I tried to use up some of my old DSP to shake colors up a bit.  You already know where the santa is from! LOL!
Here they are up close....


It has been snowing all day today,  it puts a big smile on my face and  puts me in the holiday mood!  Hope you are warm and toasty where you are,  and for those of you in those nice hot climates: Hawaii and Australia...  I wish I could sun my buns!  enjoy all!  xoxo

Friday, November 19, 2010

Santa on a Candy Cane

It's friday It's friday!  my favorite day of the week!  today's post is a revisted idea that you see everytime you visit my blog.  Last year I posted the santa candy cane and so this year I vamped it up a notch vintage style. All products are from the SU! Holiday mini.  I started by using the large oval Big Shot die and stamping the Jolly Old Saint Nick stamp, took out the Bright Christmas set to stamp the Holly Jolly Christmas.  I adhered the gold waffle paper around the oval shape and then added the Tinsel Trim.  Very easy ladies!  xoxo


Thursday, November 18, 2010

Welcome Christmas

Getting that holiday feeling..... today's card is made with the new set called Welcome Christmas, I also used the embossing folder called Vintage Wallpaper
Cardstock:  Kratft, Newprint DSP, whisper white, basic black
Accessories:  Cherry Cobbler Seam Binding ribbon
Stamp Sets:  Welcome Christmas and Bright Christmas  xoxo

Tuesday, November 16, 2010

Thanksgiving metallic pumpkins

So here's what I started with.... remember those really cheap pumpkins with lids made by Libby's that you see everywhere for sale?  Well mine has been sitting around my cupboards for years.  I saw in blogland that people are painting glass with Looking glass spray paint so I thought I might try and spray these puppies.  I opted to use the metallic spray paint instead of the  looking glass kind.  $3.99 verses $14.99 hence the cheaper one!  You will want to spray with a spray primer first then I put gloves on to hold the inside of the glass pumpkin while spraying the outside.  I used the Rustoleum Metallic silver. Let dry overnight...

Here's what they ended up lookin like!  Aren't they just gorgeous!  I found these adorable candleholders
at TJ Maxx.  Just love them!  xoxo


Monday, November 15, 2010

Paper Turkey

Isn't this turkey funny!  He is made from 60  4 inch circles cut from an old book.  The feathers on the back are from the large oval punch that I hand cut to a point.  His head is made with 5 of the scallop oval punches folded together and glued.  I used a  sponge dauber and some soft suede ink to distress him.  His gobbler under the chin is made from a punched out heart.  The feet are a flower punch cut in half.   Gobble Gobble!!  xoxo 

Sunday, November 14, 2010

Molbaks pictures

Took a little visit to Molbak's on friday with the girls for the annual Poinsettia Festival.  If  you are local and have not gone to this event it is a must!  The colors are amazing and the varieties of Poinsettia's are endless. It was fun to walk thru and look at all the different colors and variation of colors they have to choose from not to mention getting to sample some yumo ice apples from Wenatchee and Danish Kringle from Ballard.


There are many beautiful spots to take pictures for the holidays for your family.  xoxo

Quick cards

Here's a few quick cards for you today,  these can be easly done for your classes and clubs and uses all the new product from the mini.  Hope there helpful!  xoxo  Happy Saturday!


Friday, November 12, 2010

Little Snowman

Today's post is a fun quick easy card for you.  Here are the ingredients:
Baja Breeze cardstock, Cherry Cobbler cardstock
Snowman from Joly Old Saint Nick
Scallop Oval punch, Large Oval Punch
Big Shot Die Tastful Trim
Big Designer Buttons
Red grosgrain ribbon
xoxo

Wednesday, November 10, 2010

Jolly Old Saint Nick is back!

He's back and I can't put him down!  I love this Santa!  This post  has the Santa Christmas card made with the background stamp Christmas Collage #121279 and Cherry Cobbler cardstock. The Santa is from yes, you guessed it!  Jolly Old Saint Nick set #121711.  I added the new Tinsel Trim to the bottom of the card.  Remember Becky Roberts cute Halloween cone I posted a week ago?  Well I went ahead and made one with ole saint nick here.  I filled it up with the yumo vintage sugar sticks.   xoxo

Monday, November 8, 2010

It's beginning to look a lot like Christmas! a vintage one anyway....

Good Morning all!  I think you have all noticed that while out and about running errands and such all the Christmas decor has crept it's way in all the stores ALREADY!  so in light of all the decorations making me crazy I thought I would stamp a few Christmas cards.  I know it's not too early to be thinking about those anywho.  The cards today are made with SU! new stamps sets:
Jolly Old Saint NIck -  Wood -121711 or Clear stamps - 121321
Christmas Collage -  Wood only  # 121279
Christmas Postcard - Wood only # 121428
All can be order or view on the tool bar on the righ tof my blog.....

this is an ornament I made by using a coaster.  The dsp is the newsprint and the paper on the background is very vanilla that has been distressed with more mustard and soft suede.  I incorporated the black lace trim from the Halloween collection to try and use it up!  and added the seam binding in Cherry Cobbler.

This ia very simple fun card you could make at your stamp clubs or camps.  I have used the Cherry cobbler cardstock and very vanilla.  The Christmas postcard was stamped right onto the vanilla and then mounted onto Old Olive cardstock.  I used the new silver Tinsel Trim to frame the image and added the old olive buttons.  xoxo

Friday, November 5, 2010

Turkey Lurkey- Gobble Gobble

Happy Friday!  Today's card is a turkey lurkey card made with the new 2 3/8 scallop punch. Punch 2 scallop punches and score them on each hump and fold them together and then glue them.  The head is punched from the 1' punch in very vanilla.  The beak is hand cut from the pumpkin pie cardstock.  The feet are punched from the daisy punch.  The gobbler is a piece of paper cut at 1/8'  x 4 ' and curled around a small pencil.     Gobble Gobble!!!  xoxo

Wednesday, November 3, 2010

Vintage Snowman Ornament

Happy Hump day (wendesday!) today's post is a vintage ornament I made by cutting out a top note die from the big shot and adding the new Glass Glitter to it .  I then punched out the large oval and stamped the cute snowman from Jolly Old Saint Nick stamp set and lined the oval with the new gold waffle paper.  I attached it to the top note and then added the new Tinsel Trim the inside of the oval.  The snowman has been watercolored with the blender pens.  xoxo   

Tuesday, November 2, 2010

Ornament swap is here....

Good Morning!  a couple of weeks ago I posted an ornament I made to send out to a swap I participated in, well now all the ornaments are back to me and here they are!  There were 20 total so I just chose a few to post and will add more at a later date.  Everyone did an amaing job!    Many came without names, so nice work to everyone who participated!  xoxo
Everyone did an incrediable job!