Tuesday, March 31, 2020

No Matter the Weather


No matter the weather is baaaack!
I saw these boots and thought how cute 
would they be as kids wellies.
I stamped the boots on yellow cardstock,
at the bottom I colored in the soles with black
and the next layer up in orange.
I added googlie eyes to the front.


I didn't have an umbrella stamp so I drew one 
on the blue cardstock and fussy cut it out and
stamped the flowers on the umbrella and also
cut out the handle. 
The rest of the stamps all come in the
stamp set. 
The boots were colored in with a lighter
color yellow. 


This would be a cute card to send off for a girls 
birthday.  
This was so fun to make!


Here is the stamp set and what images are in it.


Sunday, March 29, 2020

Doormat Refresh


Are you getting restless?
My creative mind won't shut off!
Sooooo, I was looking at my front door and garage door
mats realizing they needed a refresh.
Instead of throwing them away you can paint them
to freshin them up!
It was very faded before the above the picture.


I ended up doing both door mats, front door
and garage door mats.


You can see in the above picture where the home
is very faded.
All I used was this inexpensive acrylic black
paint just bought at the craft store and a simple
brush.
Go right over the existing words, if you can't read the words and it has faded away, check online where you bought it to see the original mat design. 
You can also pencil it in first before painting it.


See how nice and vibrant the black the refresh is?!!!
If you want to make your own you can order online
at amazon a plain mat and handletter or use a design
you can find online.  Get creative!!!


Just a little motivation for you since 
we are all stuck indoors here in Washington!


Friday, March 27, 2020

No Matter the Weather returns!


 I warned you!
Here is a fun card and envelope project for you to 
try out. 
Remember,  if you do not have this set, see what you have in 
place of it.


This is a fun way to make your envelopes,
so start with two same size envelopes. 
You will be cutting on the landscrape (long side)
of the envelope.
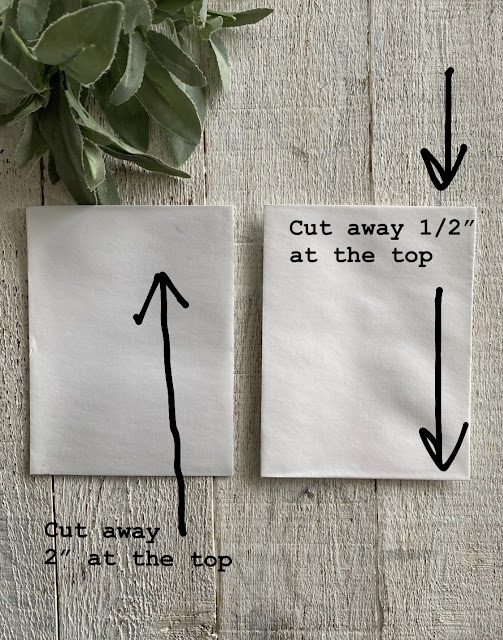
The one on the left shows you to cut 2" at the top,
I used a pair of decorative scissors on this one.
The one on the right has you just cutting away 1/2",
once done lick the envelope shut.


The next step for the envelope with be to run the one
envelope on the right through the corrugator.
What this will do is give the paper a crinkle
look but also aids in making the envelope just a slight
bit smaller the long way so that you are able to
put the top of the other one you cut over it.


This is the other 2" piece that I cut with decorative scissors,
I like how the scissors I chose has a scallop edge to them. 


Using the flowers in the stamp set, I stamped the across the
top of the envelope.


When done both pieces should look like this
Now onto the card....
Cut a piece of colored cardstock at 3 3/4" x 5"
Then a piece of white cardstock at  4 3/4" x 7"
Fold your white cardstock over and prepare
to stamp your images.
I used a blender pen to get nice and light
colors on my design


I always like to add a little 3D images to the card
so I used stampin' dimensionals to pop up the pot
of flowers and the rabbit.


You can see from this angle how the card sits on top
of the base piece of red. 
Once your card is all done it fits nicely right into
the corrugated envelope.


Like this!
Now, take the top of the other envelope and put it over the
top of the base to close the envelope off.
I made a small tag for the card and used jute twine
to tie it off. 


Here's a few close up's of it.


Here it is before putting it in the envelope. 
So fun and cute to make!
Do you think you would make one of these?
If you do,  send me your pics!
I would love to share them!


There will be more of this set showing up,
I promise! 

Wednesday, March 25, 2020

More No Matter the Weather


WARNING!
Beware,  there will be many posts with this
new stamp set!
It is so versatile and adorable!


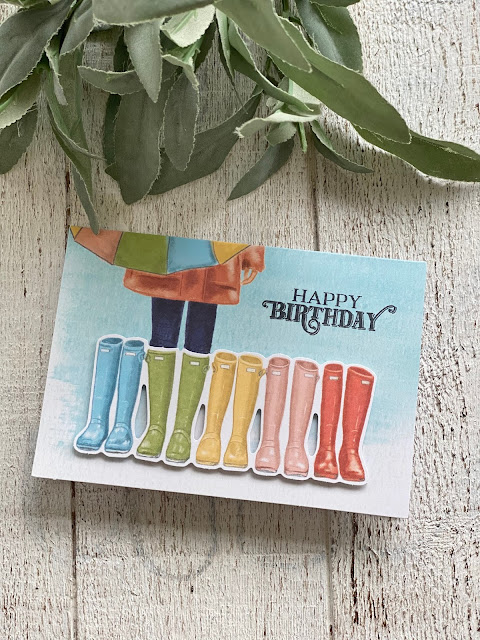
I used only the boots and stamped them on coordinating
colored cardstock that matched my background
paper which is retired. 
I always say, use what you have!  
So look through your paper and see what you can use.


Using black ink stamp three different boots, fussy cut 
them out and using dimensionals only pop up the 
center one.  Just glue the left and right one 
right onto the paper.
You can add a saying, but I am adding mine to the 
inside of the card.


This is just one of the stamp set that came in
this month's Paper Pumpkin. 
I don't see that you can get the stamp set at this time,
but the kit that I showed in my previous post is available
and you get all the product you see there and more
for only $10.00
Let me know if you are interested.

Monday, March 23, 2020

No Matter the Weather


Good Morning!
Bringing you some creative sunshine!
And look at this month's adorable Paper Pumpkin!
I know many of you are still ordering the kits monthly and
what a better time to jump on board and get on the bandwagon!
Now that we are all mostly at home, this kit will come
directly to your mailbox.
 You can choose one month or as many as  you like.
And you can keep it going for as long you as you wish.

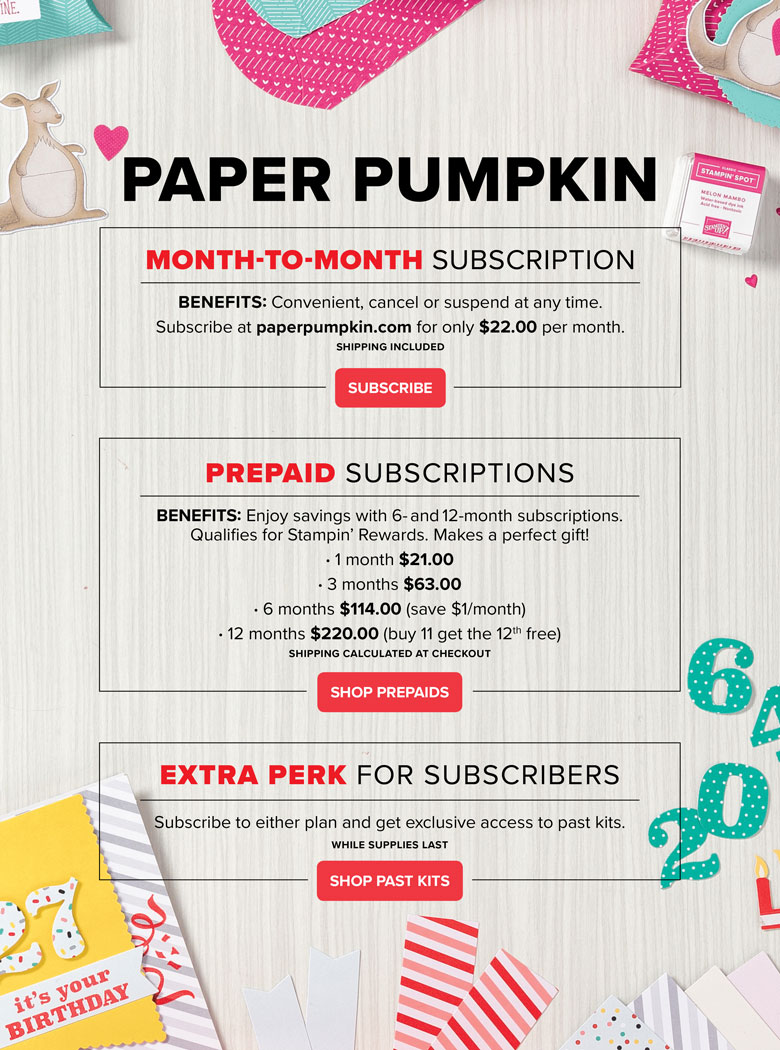
Here's how the subscription works;

Paper Pumpkin

It's so fun each month to open these boxes to see what surprise
is inside!  And many times you get cards or 3D projects or treats holders to make, all of these can be done with your littles too!

So if you think you'd like to try it out click below 
and designate me as your demonstrator-  Julie Pitta

Click  HERE

Now let's look at this month's gem!


Here's what's in this month's kit
You also get a bonus extra stamp set this month


This is also a You Tube video every month showing you a step my step instruction on how to make what's in the kit.
I always choose to make alternate card ideas, so mine always
look just a little different then the kit shows.
Here are mine this month.


This month's kit is called
No Matter the Weather and I could just squeal with how
cute it is!   Both the stamp sets are cute as well as the printed 
pieces to put the card together.  I mean look at those boots!


I am pretty much a simplistic stamper
Over the years I have scaled down my cards.
I like the less is more approach where I used to make
cards and they were pieces of art!
Not anymore,  I just like them simple


You get four of each designs,
you can see I changed it up a bit.


Aren't you just loving these!!!!


Just in time for Spring, you could also add an Easter saying.

Here's the video to follow


Saturday, March 21, 2020

Be Still


This is my VERY over grown Chocolate Vine
I decided to go out and take a shot at trimming it.
I took it down about a 1/3" and it is just starting to fill
in just in time for spring.....


You can see in the picture how the canes grow and twist around.
While I was trimming it I could see all the twisted canes.
Of course my creative brain went,  oooohhh, I could
make something with these canes.


I ended up making these crosses, similar to ones I made last year.
It didn't take much to create this outdoor beauty!
I took two pieces of the vine and using a very light jute thread I just threaded it on through.


I made a few of these and handed them out to neighbors to lift their spirits.
I truly love creating things from things I find in the yard, etc.


It's comforting reading this......


Thursday, March 19, 2020

Easter Eggs


Good morning friends!
We need to have light and hope in this time of our global
melt down.
As I always share,  try something new!
We all have quite a bit of extra time on our hands if you are working from home or home with your kids.
I will continue to post ideas for you to keep you busy and seine
during this trying time.
How about using what you have on hand to give these Easter eggs a try?


All you need is newspaper or scrapbook paper.
I used scrapbook paper for my eggs as that's what I have on hand.
Get some modge podge and a sponge brush or any brush


Grab some plastic eggs, you can see mine are old
and even stained! 
Starting with your brush and some modge podge spread
then glue all over the egg.
(expect to use your hands, stickiness may be involved!)
take a piece of your paper, (about a 4 x 4" size)
and start wrapping it around your egg and pushing it into
the egg.  The glue will soften the paper and allow this.


Take a look in the above photo, this is how the eggs
will look before you start to push the paper into the eggs.


And in this photo how after I pushed the paper down how
flat they look and become.
Let the eggs dry about 15 minutes.
Then using any type of glitter,  
(I used the thick sugar glitter) 
Lightly add some more modge podge (just a light bit)
and shake the glitter onto the eggs, let dry


You can see the thick chunky glitter I used in the photo.
I also added the twine and small tag to the egg.
You could also add any ribbon or twine.  I also thought about
punching out an image like a butterfly and adding it or maybe a felt flower.   Get creative! 
 And if you make these send me a picture!


All done!
Now scatter them around the house where ever you put your decor for Easter!  In bowls, baskets, setting in a 3 tier tray 


So cute!