Friday, October 30, 2009

Snow Swirlied and SU! Folder


Today's post is a card made with the Stampin Up! folder. In the photo you can see
that they come folded over. I took my oval template and traced it onto the folder
then used my SU! cutting blade to cut out the oval. That way when you run it through
your Big Shot Machine it gives you the border you see in my card! Sooo cool! These
folders cost $7.95 so you don't worry too much about cutting them. You can buy 2 of the
same for that price! You do need the Big Shot Machine to run these folder through.
The stamp set used on this card is Snow Swirled. Looking for any of the products? go
to my SU! website to order. Ships directly to your home! xoxo

Thursday, October 29, 2009

Sugar Skulls


My teenage daughter Shelby came home from school today annoucing she had learned all about
Day of the Dead in her Spanish class which we had just also learned about on our trip to Disneyland a few weeks ago. She decided she wanted to make these traditional Sugar Skulls
for our Halloween Celebration. Well here they are! And here we are making them!
It was quite fun and really neat that my "teenager" wanted to make them! xoxo

Sugar Skulls are a traditional folk art from Southern Mexico used to celebrate Day of the Dead. Mounds of colorful sugar skulls are sold by Indian vendors in open air village markets during the week preceding the holiday. Spirits of the dead are welcomed back to their homes with beautifully decorated altars made by their loved ones. Sugar skulls, marigolds, candles, incense and special foods adorn home altars.
Families take the flowers and sugar skulls to the cemetery to decorate the tombs on November 2. Sugar skulls are colorfully decorated with icing, pieces of bright foil, colored sugars and usually bear the name of the deceased loved one being honored. They are easy to make by children and adults, and if kept dry, they can last a year.


Autumn Leaves......


Today's post is made with the beautiful SU!
Autumn Meadow DSP paper. Below is a picture
of the template of the card on how it was cut.
You can see the little dew drops on the leaves
put on with Crystal effects. xoxo

Tuesday, October 27, 2009

Vintage Halloween Treat Box


Today's post is this Vintage Halloween treat box
made out of a plastic utility box! You know,
the kind you get to put fishing tackle in or
embroidery thread. This cute idea was shown
to me a couple of years ago by the very talented
Tammy Mullins, a fellow SU! Demonstrator.
Scroll down to see how the footing on the bottom
works. I purchased 4 wooden balls with the flat
tops on them, painted them and attached them to
the bottom. Decorated it and filled it with Trick
or Treat candies! The ideas are endless, back to
school boxes, Christmas boxes. .....xoxo


Monday, October 26, 2009

MOJO Monday 110


MOJO Monday 110- today's card is made with
white confetti cardstock, Dots and Designs rub
on transfers, the new stamps set from our Holiday
Mini called Patterned Pines.. Color scheme is Ruby
Red, Chocolate Chip. xoxo

Saturday, October 24, 2009

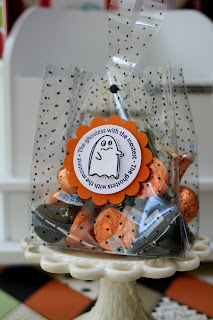
Transparency Halloween Treat Bag


This little transparent bag is made with the
new SU! Fancy Favor Die Box. The paper is
our new Night and Day paper that is transparent
with polka dots printed on it. I added the handle
at the top and put a black brad thru it to hold it
together once the treats were put inside.
Don't have the Die and want it? You can order
it online with me! xoxo

Friday, October 23, 2009

Mini Carmel Apples and Fall Colors


Aren't these adorable! They are mini carmel
apples dipped in mini chocolate chips and coconut.
I set them atop these pretty vintage plates that
belonged to my Mom. I always think happy
thought when I use these little plates they remind
me of when she used them when I was little.
You can find instructions on how to do these cute
little bites here at Family Fun. xoxo
http://familyfun.go.com/recipes/mini-caramel-apples-688916/


Had to stop and pull over by my house to take
this photo, it looked just like the trees were on
fire. Love the fall!


Wednesday, October 21, 2009

Santa Candy Canes Revisted!


I have had quite a few emails about my
Top Note Santa Candy Canes that I posted
last year. Well here they! I do have a button
to the left where you can purchase the template
to make these cuties! The candy canes can
be found at the Dollar Tree 2/$1.00 xoxo


Tuesday, October 20, 2009

Vintage Flower Topper/Pin


Today's post is a Vintage Flower I have made with
the new SU! Die Folded Flower. You need the
die to make these. Remember you can put almost
30 plus types of different mediums through the
Big Shot die. I have chose to use fabric today.
I have cut two sets of the flower and just layered
them, added a brad and the pretty pin. I put it
atop a gift I have to give, but these can also be
made into pins or I am going to make a bunch
and put them on my Christmas tree!
Pictures below show you a bit of how I made these.


Here's the gift..........

Here's the two sets you will cut out.....


Here are all the cut out layers put together


Here is the back of the flower. I cut one of the
medium sized flower out of cardstock to give
the back some weight. x0x0


Monday, October 19, 2009

Mojo Monday 109

Mojo Monday 109! Super easy sketch today
ladies! You could pound out alot of fun little
cards with this sketch! My card is made with
Christmas Cocoa DSP and real red cardstock,
added a ribbon and a aluminum circle and
stamped with the new Sparkly and Bright
Stamp set from SU! xoxo


Thursday, October 15, 2009

Howl-O-ween Trio


Howl-O-ween Trio -
These cute little halloween buggers are a folded
four way card, see the picture below. They are
very easy to make and you can order the template
on the left hand side of my website. You will recieve
a template with all the pieces to make all three as well
as instructions for the folding of the card. xoxo


Vintage Halloween Pins


Today's post are these darling vintage Halloween
pins or rosettes as they are usually called.
You can use paper or ribbon for the rosettes. I have
strung them on a needle and thread and closed them
off with a knot to pull them into a circle. I took
adhesive glue and ran it around the very edge of the
rosette and then added the large chunky glitter to
them. You can attached any halloween image to
the center I just happen to choose my fav vintage.
I posted a picture of the back as well, you can see
I used an oval punch for the pin to attached to.
You don't have to turn these beauties into a pin
you can use the rosettes on bags, to decorate with,
add a string and hang them. Have Fun creating! xoxo


Wednesday, October 14, 2009

Vintage Halloween


Halloween is near! I took some time last week
before leaving on vaca to make these darling
vintage hanging cards. I purchased a booklet
containing 30+ vintage postcards. I took modge
podge and covered the cards with it and then shook
chunky glitter atop and let dry. I found the trimming
at an incrediable little craft store and attached it with
a permanet adhesive. You can hang these around the
house, decorate with them, or if you are a real Halloween
enthusiast put them on your Halloween tree! xoxo
Here are the cards up close.... so darling......


Monday, October 5, 2009

MOJO Monday 107


Mojo monday sketch 107- Christmas is in the air!
At least the thought of Ice Skating is to me!
Today's card is made with the Christmas Cocoa
DSP paper and real red cardstock. The stamp set
is the Winter is Calling set from SU! xoxo


Friday, October 2, 2009

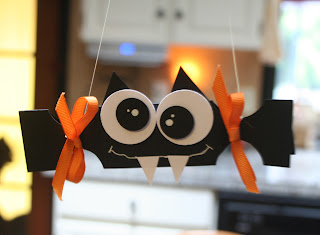
Hanging Bat Treat Box


He's Fangtastic!
Today's post is a triangle box that I have turned
into a hanging bat treat box!
To make cut a 5 x 6 1/4 inch cardstock, score
at 1 1/2, 3 and 4 1/2, turn the cardstock 90'
and score at 1 1/4 and at 5 '. fold up the box
so that it looks accordian style. Then take a
1 1/4 circle punch and punch each end out so
that you have the holes on the each end. Take
ribbon to tie up the ribbons. Use a 1' circle punch for
the whites of the eyes and 3/4 circle for the black
part. cut out fangs and add them as well as ears
and there you have your little bat! Fill him up with
goodies and your good to go! xoxo
Here he is hanging around my spooky kitchen!

Decorating for Halloween!


My favorite time of year is here!
HALLOWEEN!
I have been decorating galore, hence
the lack of stamping posts this week.
Above, this photo is in my kitchen.
You can use any glass jar for this,
I have filled it with bones, skeleton
heads, pumpkins and mini spiders
then just put a gauze cloth around the
bottom.

This looks spooky with the shadow
of the pumpkin and bird on the wall!


Of course my love of vintage Halloween items
has to be displayed. This is a rack I have at the
front door for the kids coats and backpacks,
now displaying my cute vintage friends.

Back to the kitchen, where right above the
centerpiece I have hung this paper chandelier.
It's pretty cool for only costing a dollar! I added
some glitter to it to glitz it up. Hanging above it
is another large piece of gauze in white with
spiders all in it.

This is the back door in my kitchen,
these are soooo cool! They fit the
entire door and glow. Mind you it
is 9 am and look at the glow it gives
in the daylight. Wait til tonite when
the vampires come out! (hee hee
where's Edward!)
Hope you enjoy the posts, I will be
posting creative stamp stuff soon!
Have a great weekend! xoxo