Monday, June 29, 2009

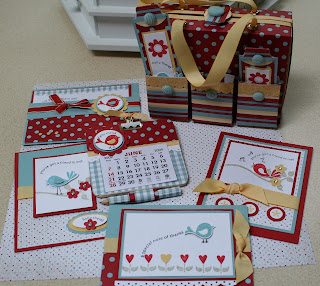
Summertime Picnic Baskets


Summertime is here! What a great time to make these adorable picnic baskets to fill with
goodies for your friends! I found the templates to purchase for these at http://laurenm.blogs.splitcoaststampers.com/ They are quite easy to assemble once cut out
and of course you can imagine the possibilites! They are soooo stinkin cute! You also recieved
a much smaller template for a little basket too. I have made one and will possibly post the
others I have created tomorrow. xoxo

Peachy Keen!


Quick little summer card! Yikes it's hard to stamp with the kiddos of school! Not complaining
of course, just not able to get into my craft room! This card is made with kraft cardstock, vellum, certainly celery and the new tangerine tango! The stamp is a retired one from SU!, I
always find it hard to grab any stamp set when the new catty is coming out. The textured
background is the large sanded background stamp. xoxo

Friday, June 19, 2009

Becky Roberts Tote-lly Awesome Tote


Had a wonderful time making two different of these totes
that hold cards or any other goodies you might like to add.
I found the tutorial at http://www.inkingidaho.blogspot.com/
you can purchase it there. It comes with complete instructions
then you can add a little twist to yours. I added the flower paper
pencils to mine and of course chocolate! x0x0

Monday, June 15, 2009

Hello Kitty Card


My Daughter Shaelyn decided it was time for us
to do a card yesterday with her sizziz Hello Kitty Die
so we put it all together and came up with this card
Love that she loves to do crafts! x0x0

Sunday, June 14, 2009

Melon Mambo kick!


I think I am loving the new Melon Mambo color! Yesterday I decided to get
out the shaving cream techinque and try it with Melon Mambo. Here is the result. Kinda goth and cool looking with a girly edge!

This next one I tried and then stamped over the top of it with
the stamp sanded. I used both the Melon Mambo and Crushed Curry
on the background of this one. xoxo

Dance and Gymnastics Recitals!


Yesterday was a full day of getting to see the girl's year long work at their
favorite craft, dance and gymnastics! We had to scramble to get to each,
Shaelyn's was 1-2:30 and Shelby's was to be at her's at 2, starting at 3! Phew! we pulled it off! And I have to say, I am so proud of each of them,
they worked hard all year and it showed! My favorite was just seeing the
HUGE smiles on their faces as they performed. Melted my heart. xoxo
Wednesday, June 10, 2009

The In Colors are Here!


I got together with my friend Kirstin today over at http://www.papertreelane.com/ and had fun using the new
in colors we both just recieved. Wow are they beautiful! This card was made with the small pennant die
that I folded over a regular 5 1/2 x 4 1/4 card size. The colors are the new DSP Razzleberry Lemonade,
the new in colors cardstock in Melon Mambo, crushed curry, and good ole' pixie pink.

f
For this card I embossed the Eastern Blooms flower (Kirstin's idea!) in clear powder. I then
added the sanded background stamp in versamark to that for a little hawaiian look. The paper
is the new Bermuda Bay and Soft Suede and of course the matching ribbon!


This card is made with the new beautiful Rich Razzleberry and the new Circle Circus stamp set.
I used the new in colors ink and stamped each circle and added the rhinestone brads.


Here's the new DSP Razzleberry Lemonade!


Here are the new In Colors! Rich Razzleberry, Crushed Curry, Melon Mambo,
Dusty Durango, Bermuda Bay, Soft Suede and matching markers! AAAAWWWW!!! xoxo


Sunday, June 7, 2009

Fourth of July Centerpiece


Of course I am jumpin the gun here, but thought it would be fun to make one of these. I took
a soup can and covered it with red, white and blue DSP paper, filled the can with floral foam.
I then made the pinwheels in the red, white and blue, stuck them in the can with with straws
attached. I punched out some stars with the star punch and attached them to wire and stuck
them in as well. Very easy to do my friends! It stands about 24 inches high! The instructions
for the pinwheels are in my March postings. xoxo Getting ready for those fireworks!

Friday, June 5, 2009

Graduation, Money Roses....and scrapbooks.


My Niece who I just absolutely love and have adopted as my own is graduating tuesday, her
party is tomorrow so I have been working on goodies for her. I always give family graduates
a money rose. I buy a fake rose, you can use any money denomination you choose. I always
give them $100.00 so I use 10 10 dollar bills. Scrunch them into ties in groups of five and
twist wire around them and then wrap them around the stem of the rose. Add your ribbon
and tags. Can you tell her colors are red, black and white! Ya think!
I also did up a 20 page scrapbook with pictures from all the things we have done with her.
Can't wait to see her graduate! Although, I will need lots of kleenex! xoxo

Thursday, June 4, 2009

Fun Funky Flower Pencils!


Check out these adorable flower pencils!
I found these online at Patty Bennetts blog.
My daughter and I made up a bunch of
them for her teacher yesterday. How to's
are below and some close ups too.
You can also put them on pens as well
we just went with what was on hand.


The cordouroy button in this photo I reinked
with a dauber and brocade blue in to get this
color. Note you can add any embellishment
to the center of the flower. Mine have buttons,
brads, cordouroy brads and rhinestones.

So here are the instructions....
Start with DSP paper of choice, you will need
to cut three pieces, the first is 2 1/4 x 12,
the next is 1 3/4 x 12, and the last is 1 1/4
x12. as shown below

next you will cut up with your snips
fringe leaving a 1/4 space at the top

Take you double sided tape and wrap
around the top of pencil...

Start with the smallest piece first and start
wrapping around the pencil Note: which
ever side you want to have showing is the
side you put your adhesive on.

It should look like this, keep adding the
next two. when done tie a small amount
of ribbon around the under side of pencil
to give extra hold

Once it is all together flatten out all the
layers as you see here, take your snips
or bone folder and curl the botton layer
of flower, Add the embellishment to
the middle and you are done!
Have fun making these, they are a great
way to use up your retired DSP paper!
Very easy for the kids too, my 8 year old
was able to make 4 of these in an hour.
x0x0