Monday, February 27, 2017

Beautiful Butterfly


This card is a mix of three stamp sets: Papillon Potpourri,  Gorgeous Grunge and Kinda Eclectic. 


I stamped the gold starburst first on the white cardstock and then used the Aqua painter with the Calypso Coral and the Island Indigo.  I then stamped gorgeous grunge fleck stamp in black. 


Saturday, February 25, 2017

Sweet Cupcake


Awwwww.... the beauty.
Yesterday I decided to head over to Cottage Lake and just be.
It is very cold here right now and we have had some inclement weather.   Sunshine, then rain, then snow....  yes, snow.
But as I sat on the dock I just loved the colors and reflection of the clouds in the lake.  
Make your heart like a lake with a calm, still surface and great depths of kindness.- Lao tsu


Birthday wishes with a sweet cupcake card. 
I used the polka dot embossing folder for the background paper.  The sweet cupcake is a 3 step stamp.  You just layer each color on top of each other to create the cupcake image.  So fun!


Thursday, February 23, 2017

Lovely Lace


Lovely Lace is the embossing folder I used to make this rustic romantical card.  Have you tried to use a embossing folder? If not, it is a plastic folder that you put your cardstock into and run through the big shot machine to create a raised image on your paper.   I used a sponge dauber with a craft white ink pad and lightly added the ink over the kraft colored cardstock and let dry.
Seriously,  it's that easy.  
Then just add your sentiment, some ribbon and of course some bling.   I added the pearls and gold thread.


Big Shot machine - above
Lovely Lace embossing folder-below


Well, here's a good one.  I literally had just hand lettered my chalkboard with this new saying and put it on the porch. 
 I think I jinxed us!  It started to snow!  Crazy weather!

Tuesday, February 21, 2017

Paper Pumpkin

     February paper Pumpkin - Many Happy birthdays


I get many questions about Paper Pumpkin.  It's a monthly subscription you receive via snail mail where a bright orange box arrives with everything in it you need to create that month's project, cards, wreaths, journals all kinds of creative goodness! 

You can choose your subscription, it can be one month, 3 months, 6 months, etc.   You can also stop it at any time.  But why would you?!  You will love the projects that show up at your door and it gives you step by step instructions on how to put it together.

Right now you receive a FREE stamp set or product of your choice when you sign up for a 3 month subscription for $55.00

                 Click HERE to sign up for Paper Pumpkin
                Choose your Sale A Bration item HERE

Get a 3-month subscription for just $55 USD/$74 CAD and instantly qualify for a FREE Sale-A-Bration item! 


  Feb_PP_Main (1)

If your a creative and you want to change up the kit and create your own things, you can do this too. Here are some more ideas with this months kit.

February_PP_alt1


February_PP_alt_2

As always, hang onto that stamp set so you can use it on future projects—like this card. The geometric line images create simple background in any color scheme.

February_PP_alt3

This kit is on fire! Don’t let the fun burn out—hahaaaaa!

PP_Birthday


Sunday, February 19, 2017

Rustic Love


Want to try something different? 
I made this card by lightly brushing on white acrylic paint with a sponge brush to a piece of kraft cardstock.  Let it dry and take a floral stamp and stamp in a light brown.  I used Baked Brown Sugar ink pad on top of the brushed white to get this effect.
Looks nice and rustic!


I stamped the image and cut out the frame with the deco labels with the Big Shot machine.  Added some gold threading and white baker's twine. 
Hope ya'll are having a wonderful president's day weekend. 


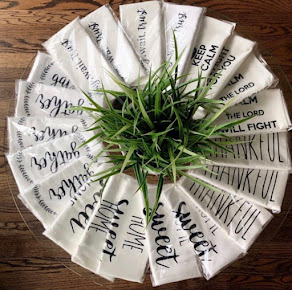
Also excited to announce that my Etsy shop is now open and ready for you to come and see my flour sack towels!
Visit my store HERE


Friday, February 17, 2017

Toadally Awesome!


Sharing how "toad"ally awesome YOU are today!
Appreciate everyone of you that inspire me to be creative and share ideas with you all.  I truly love creating in different areas of my life and I want to thank you all for cheering me on everyday!


This card is made with the Jar of Love stamp set and the adorable Your Sublime stamp set has this cute toad in it.   


Yesterday my sweet friend Colleen took me to high tea at the Village Bakery and Tea Cottage.  Now don't laugh.  I truly have never had tea, maybe a sip at sometime in life, but have never embraced coffee or tea.  So this was truly an adventure and new experience for me!  Remember first of the year new adventures?  Well, here is a first for me!!   And it was ah-mazing!  


It was a four course lunch of delisciousness!  (is that a word?)
soup,scones, salad, sausage rolls, mini sandwiches, fruit, desserts.
Did I say desserts???   oh my!  If you are local, I suggest you trying this delightful place.


Wednesday, February 15, 2017

Photo Tiles


Have you ever tried putting a favorite photo onto a tile to create a sweet picture paperweight or a coaster?
It's super easy and great fun. 

Start by going to your local Lowe's or Home Depot and purchase a box of natural tiles.  You get 9 in a box for a mere $6.00.
Get some Vellum cardstock and choose a photo that you love.
On your printer first copy your photo onto a piece of copy paper.  Then reset in the copier and add your vellum paper to your tray.  Print in black, let dry and cut to fit your tile.


Using a sponge brush, lightly brush a thin layer of Mod Podge on the tile, then add the photo and lightly brush a layer over the top of the photo making sure you leave no streaks of mod podge.
Let dry.  Once completely dry, using Staz On black ink stamp a word of your choice.   

Monday, February 13, 2017

Love Never Fails


Another one of the projects we did at the creative class was make these white washed signs.   
I started with plain blocks of wood cut at 6 x 6", then on the left I used an old paint brush and some white acrylic paint and dry brushed the wood block. 
 You do this by barely brushing the paint onto the wood.
The wood block on the right was whitewashed.  This technique is done by puttina a bit of the white paint on a paper plate and adding some water so that it is a liquid consistency.   Then using a sponge brush, lightly paint the white paint onto the block. 
 Pretty easy.  Let dry.  
This is where I challenged my creatives.  I hand lettered Love Never Fails onto the block. All they had to do was color it in with a black sharpie and add a ribbon if they wanted. They turned out super cute.


Here's what it looks like before you paint it.

This is the dry brush technique.  


Saturday, February 11, 2017

Valentine Candy Tin


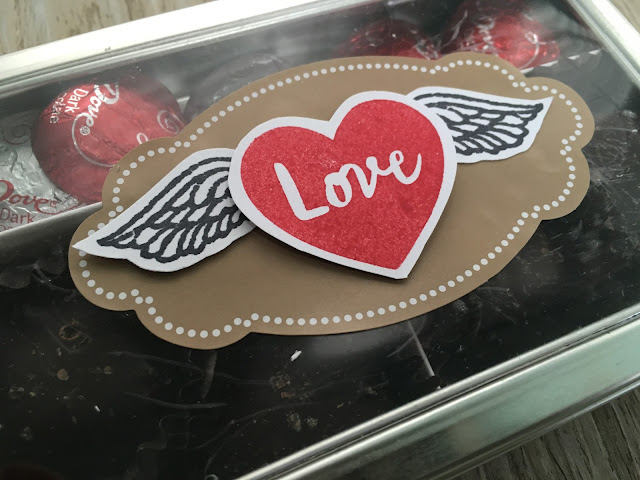
Yesterday we got together for my creative class.  It was a fun filled morning as I challenged my ladies to try new things.  This was one of the projects they got to make.   I used some tins I had and made a divider for the inside.  We then filled them with See's candie and Dove chocolates.


The decorated top of the tin is a label sticker and I used some stamps from past Paper pumpkins.  You can decorate the top with any Valentine stamps you have.  


Don't these look delish!  I love chocolate!


Thursday, February 9, 2017

Valentine gifting


Packing up some love today to gift to a dear friend.  Using my coffee valentines to grace her package.
We all need to love on and lift each other up.
  Even on days when it's not Valentine's day. 
What plans do you have for your favorite valentines?


Tuesday, February 7, 2017

Valentine Decor


I love when I get pictures from you all with creative things you have done.  Susan sent me this picture above of her mantle decor with the wood chalkboards I sold last fall.  I just love her decor!
She did a great job lettering on her chalkboard.


I've scaled down my decor considerably compared to how I used to decorate for holidays.  
I found the banner and the tassel banner both at Target. 
 They are pretty reasonably priced, $7.99 each.  


This pretty chalkboard sign was given to me for Christmas
by my dear friend Susan.   I added the chalkboard sign to it and wrote LOVE in chalk for valentine's day decor in my bathroom.


More chalkboard lettering in the kitchen with my lovely Glassybabys.  
I love it when ya'll send me pictures of what's happening over in your homes.   Feel free to email me your pics, 
 I just might post them.  (with your approval of course!)

Sunday, February 5, 2017

Be My Valentine


Happy sunday!
Here's a little sneak peek into one of the things we are making this coming friday in my February creative class.
There is still room for 3 more creative bodies!  If you'd like to attend, shoot me off an email to get you registered.
The time is 10 am to noon. cost is $30.00
juliepitta@rocketmail.com


Friday, February 3, 2017

Valentine Teddy Graham packaging


It's finally friday! 
Long week my friends.  I finally figured out how to box these teddy grahams up for the Ronald McDonald house kids.  I attached a stamped bear to the clear box filled with the bears and added a ribbon.  Pretty simple
 A sweet little treat for them.  


In case you missed the previous post, this is what they look like inside the box.  The how to's are on my previous blog post.