Wednesday, November 30, 2011

Decorating with Epson Salt


So look what you can do with Epson salts!  I took mason jars and poured Espon Salts into them to make it look like snow!
Then......in the pictures towards the bottom of post I took a candle and brushed Modge Podge around the candle then rolled it into the Espon Salts and it looks very glittery.  I haven't decorated the candle anymore than the the Epson Salts and look how beautiful it looks!  The picture below is what the mason jar looks like up close with the "snow" in it.
Now run to Target and get some Epson Salts!  (or your cupboards!)


Here I just put the epson salts into a plastic container.  Brush on  the modge podge with a sponge brush and roll the candle right into the salts.  Let dry.   Below is how it looks dried.  I haven't even decorated it yet!  So pretty!


Pin It

Tuesday, November 29, 2011

Merry And Bright

Merry and Bright card
Ingredients
Cardstock:  Whisper White, Real Red, Baja Breeze
Ink:  Soft Suede, Real REd, Baja Breeze
Stamp Sets:  Merry and type and Winter Post
Accessoires: Polka Dot Ribbon, Polka Dot Brad, Dazzling Diamonds Glitter, Blender Pens< Mini Oval Folder for the Big Shot

Sunday, November 27, 2011

It's Good to be a Hostess Promotion!


Click on the link HERE  to view the benefits of Hostessing a workshop
You can hostess a catalog order or have me come to your home to do a personal workshop with some amazing products!  Email me if you are interested @ juliepitta@rocketmail.com

Saturday, November 26, 2011

70th Celebration

It's been a full weekend of Thanksgiving and celebrations!  Not much time for creating, except memories. The most important kind.  We celebrated my Dad's 70th birthday at a local Winery.  It turned out to be an incrediable evening.
We had local wine, yummy catered food and my Daughter Shelby sang the song "Landslide" to all the guests during my Dad's slideshow presentation.   The picture above is our immediate family. 


Here are all my Sister's minus one, Dad and his Wife and my kiddos.


All the Grandkiddos so far......

My dearest Friend of 30 years Ceri
Hope you all have had a wonderful weekend with family and friends.

Thursday, November 24, 2011

Wishing Everyone A Happy Thanksgiving

Thanksgiving Day brings to mind
the blessings in our lives
that usually go unnoticed:
a home that surrounds us
with comfort and protection;
delicious food, for pleasure
in both eating and sharing;
clothes to snuggle up in,
books and good entertainment
to expand our minds;
and freedom to worship our God.
Most of all we are thankful
for our family and friends,
those treasured people
who make our lives extra special.
You are part of that cherished group.
On Thanksgiving, (and every day)
I appreciate you!
Wishing you all a Happy Thanksgiving!.


Monday, November 21, 2011

Online Extravaganza Begins today!


Our Stampin Up!  online Extravaganza begins today! goes Nov-21 - 30th!
Click on the link HERE to view everything on sale!
You can save over 60% on these items! Online only!
Some items are for 24 hours only so be sure to get your order in!
Click HERE for my online store!

Beau Chateau Christmas Ornaments

Here are the Beau Chateau Ornaments that I promised to show you.  Aren't they just show stoppers!
You  are going to follow the same directions as the Vintage Newsprint Ornaments, I will post below for you.
If you don't have the Beau Chateau DSP paper then you can always you the Beau Chateau Fabric!  Yes!
this works with the Modge Podge great too. I added our Stampin Up Exclusive ribbons to decorate them with and the Beau Chateau Side Notes to adorn them and the Pearls.    Try to keep the images as close to what the paper looks like when you are teraring you pieces to attach to the glass balls.  


Instructions

Take your DSP Newsprint and tear small pieces and set aside. Put 2 TBLS of modge podge in a bowl and add a teaspoon of water to dilute it. Take the pieces of DSP and drop into the bowl let sit for 2 minutes to let the paper soften. Take your ornaments and remove the cover at the top where you hang it and set aside. Your paper should now be soften start covering the ornaments with the pieces of DSP til it is totally covered. Take the Mica Snowflakes and cover the ornaments with them and let dry. I set the ornaments on top of a drinking glass to dry. To decorate choose matching ribbons,  I used the Pretty In Pink Satin Ribbon, Chatilly Lace, and Baja Breeze Seam Binding Ribbon and silver cording.  Then add your Beau Chateau Side Notes or Rossettes and Pearls.    Drop me a comment and let me know what you think,  I love to get feedback!  xoxo

Saturday, November 19, 2011

Vintage Christmas Ornaments

Good Morning everyone!  wow did the week go by fast!  I made these vintage Christmas ornaments in a snap!  The information on how to make them are below with the rest of the pictures.  Hope you have fun trying them.  I have more to post too where I used the Beau Chateau DSP, they are to die for!

Here they are up close.

Here what you will need.

Cardstock:  DSP Newsprint, Very Vanilla
Ink:  Soft Suede, Basic Black
Stamp Set:  Hand -Penned Holidays  Wood # 124310  Clear # 124312
Accessories:  Mica Snjowflakes # 124115,, Silver glitter 114286, Natural Hemp Twine #100982
Sponge Daubers #102892, Glass Ornaments and Modge Podge, sponge brush

Take your DSP Newsprint and tear small pieces and set aside.  Put 2 TBLS of modge podge in a bowl and add a teaspoon of water to dilute it.   Take the pieces of DSP and drop into the bowl let sit for 2 minutes to let the paper soften. Take your ornaments and remove the cover at the top where you hang it and set aside.  Your paper should now be soften start covering the ornaments with the pieces of DSP til it is totally covered.  Take the Mica Snowflakes and cover the ornaments with them and let dry.  I set the ornaments on top of a drinking glass to dry.  Take the tops of the ornaments and take some Modge Podge and brush it on the top of the holder, now add the silver glitter  and let dry.  When the ornament and the top of the ornament is dry put back together.
Tie a piece of 2 1/2' Nautral Hemp Twine to hand your ornament.
Now on to the tag,  cut a piece of 3 1/2 ' Very Vanilla cardstock, stamp the Merry Christmas stamp in Soft Suede, now cut the end like a pennant.  Take the sponge dauber and shade the edges.  Tie a piece of the Natural Hemp Twine to the other end.  Using glue dots attach the tags to the ornaments.  I kinda of made them so they are wavy on the glass ball.  There you have it!  Aren't they beautiful!  

Tuesday, November 15, 2011

Gobble Gobble!


Good morning!  I have kids camps this week and this is one of the projects they will be making.  These are circulating all over the web with the likes of witche's feet and turkey gobblers.  Here's my version.
Here what you need to make one:
1 3/4 cicle punch for head
(2) 1 3/4 Scallop Circle punch for body and feathers
5 -Petal Flower punch for the beak (just cut one petal o & ff)
Any small flower punch for the feet.
The gobbler under his beak is made by using the Scallop  Edge Border punch
Googlie eye, M & M's , and the Cellophane bags for legs.
Dimensions for the back feather are as follows: 2 1/2 by 12 scored by using the score pad @ 1/2' all the way across the paper.   Attached to the back with glue dots.  Have fun making these!  xoxo

Sunday, November 13, 2011

Holiday weekend


It was a great weekend!  Locally we are so lucky to have Molbak's florist and nursery.  Every year they have a poinsettia's
festival where they have hundreds of varieties of poinsettias.  They also have lots of holiday home decor and themed Christmas trees.   It is so beautiful!  Here are a few pics of some of the things that caught my eye, oh and my family too!.  


Saturday, November 12, 2011

O Christmas Tree

O Christmas tree card
Cardstock:  Old Olive, Very Vanilla, DSP Newsprint, Chocolate Chip, Cherry Cobler
Stamp Set:  Merry And Type
Accessries:  Vintage Wallpaper, Rhinestones
Ink:  Cherry Cobbler, Old Olive
Instructions:
Cut your Old Olive cardstock at 5 1/2 x 4 1/4.  Put your paper through the Vintage Wallpaper
embossing folder.  Take the "25" stamp from the Merry and Type stamp set, use your stampin markers in cherry cobbler and old olive and stamp on very vanilla cardstock, punch out with oval punch.  Add your rhinestones.  Take the Newsprint DSP and cut a piece at 1/2 and accordian fold.  Cut two pieces sized at 1 1/2 inch and attach to the back of the oval.  Now attach to the front of the card.


Now for the inside.  Go back to your Newsprint DSP and cut two pieces 1/2 x 12.  Score with the
score board at 1/2 all the way.  Cut your first piece at 6 inches and glue to the inside of the card with
the tombow glue.  Now add the next piece cut at 5' attach, now 4 ' and attach and the last 3' inches.
Stamp a star at the top and add a piece of chocolate chip piece of paper at the bottom for the trunk.
There you have it!  Hope you find it easy to make!  xoxo

Wednesday, November 9, 2011

2 more days people!

                     The FREE Big Shot offer has been extended til November 11th!  You are the lucky ones!  Don't just sit there!  Get signed up to receive
your free Big Shot and all the other $350.00 worth of goodies!  PLUS!  you get to be on my team!  Come on!


If you've been looking for an opportunity to do what you love, while getting a 20% discount on your favorite products, now is the perfect time!

During October, you'll get a FREE Big Shot (or up to $100 in FREE Stampin' Up! products) when you join the Stampin' Up! family as a demonstrator.
Use the Big Shot die-cutting machine and Stampin' Up!'s exclusive dies to create uniquely beautiful projects in a flash.

In addition, the new-demonstrator Starter Kit--a steal at just $175--it contains over $345 worth of stamp sets, card stock, ink, accessories, and business supplies-everything you need to start your new business.

There are so many benefits of being a Stampin' Up! demonstrator, including

A 20 percent product discount!
A free monthly issue of Stampin' Up!'s demonstrator-only magazine, Stampin' Success!
Sneak peeks at brand-new products!
Invitations to exclusive Stampin' Up! events!
Regular get-togethers to stamp!
Free access to an online community of 30,000+ crafters/stampers and creative artists, as well as 160,000+ project samples!
Plus, access to an exclusive video and training for your new Big Shot!

                         Now, don't you want to join my team? 
         Click HERE  to sign up and recieve your FREE Big Shot!

Tuesday, November 8, 2011

Merry and Type

Merry and Type card
Cardstock:  Cherry Cobbler, Crumb Cake, Pool Party, Whisper White
Ink:  Basic Black, Whisper White
Accesssories: Northern Flurry Embossing folder, Cherry Cobbler Seam Binding Ribbon, Mini Bells, White Baker's twine, Dazzling Details,Decorative Label Punch
Stamp Set: Merry and Type

Sunday, November 6, 2011

Papercrafter's Sampler November "Harvest Essence" is Here!


November's Papercrafter's Sampler is here!  Chalk full of incrediable fall/harvest ideas for your creativity!
click on over here to see what it's all about!

Here is a sneak peek of my card

Friday, November 4, 2011

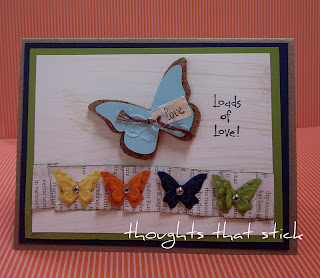
Beautiful Wings


Wow friday just snuck right up on me!  Today's card is an inspiration right out of the Idea Book and Catalog.
You will need the Beautiful Wings embosslit folder to make the butterflies.
Cardstock Concord Crush,  Lucky Limeade, Very Vanilla, Daffoldil delight, Pumpkin Pie, Bashful Blue, Cork, Newspring DSP
Accessories:  Rhinestones, Clear Buttons, Beautiful Wings Embosslit,
Stamp Set: Woodgrain, Loads of Love

Wednesday, November 2, 2011

Thanksgiving Pilgrim Card


Wow!  it's already November, unbelievable how time is a flying!  Today's card is a quick and easy Thanksgiving card you can use for your stamp camps or workshops.  
Chocolate Chip cardstock cut at 4 1/4 x  11 1/2 folded over to create your card
Basic Black cardstock cut at 4 1/4 x 2
Delightful Daffodil cardstock punched with a  1 1/4 square punch first then cut out square, 
or if you have another 2' square punch out it out.
Whisper White cardstock cut at 4 1/4 x 6 1/4, folder over and use your scallop square punch to create scallops.
Use Black Grosgrain ribbon tied in a bow at the top of the shirt.
Easy Breezy!   Have fun!