Thursday, December 9, 2021

Yarn Christmas Trees


Save or get out all those amazon boxes you've got sitting in your garage.  It'a cardboard time!


These cute and easy trees require some cardboard, yarn and little wooden stars.
I started by drawing on copy paper a triangle that I could cut out and trace onto the cardboard.
Cut out your triangle.
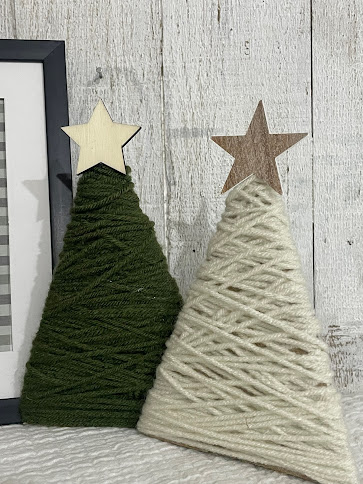

Starting on the back of the tree add a little dot of hot glue and put your first piece of yarn down on it.  Start to wrap the tree back and forth
filling up and covering the cardboard.
Don't worry about getting right to the bottom as if you do, the yarn starts to slip off.  If you stay just above the bottom once your yarn
is fully covering the tree you can then just cut away the area that is not
covered.   Tack down the last piece of yarn with the hot glue and add the wood star to the top. 


If you want to step it up a notch you could add little pearls or clear rhinestones to give it some glitz.
You could do larger size ones to, just cut your cardboard larger. 
Have fun! 


Tuesday, December 7, 2021

Mini Starbucks Cups


Well it's that time of year again where you might be looking forward a fun and different way to gift that special someone at work, teachers, women's groups, luncheons. 
These cute lil' mini cups can be filled with treats or be used for a hot/cold beverages.  You can add a coffee gift card to them too!


You can see the size of them, they are 4 oz. 
and come with a red straw.


You can see how many kisses it will hold as well as any other type of treats.   You can order them by visiting my Etsy shop 


Sunday, December 5, 2021

Diy Snowglobe


Good Morning!
Today I am going to show you how to make this cute little
snowglobe with a few pieces left from this month's Paper Pumpkin.


If you received the Paper Pumpkin kit, then you will know
that these boxes came in the kit this month to  go with it.


Next up you will want to choose a dsp paper for the inside
of the snowglobe.  I chose the the dsp paper called Peaceful Christmas.   Using circle framelits I cut my circle on the 3"
size.    I rollded it up in order to fit it into the plastic globe ornament.  
Once the circle is cut using the same paper cut yourself one of the
little winter cabins and glue it to the paper.
Now roll it up and drop it inside the globe.


Now finish up your box, using a pencil and some dsp paper
you will outline the and cut the paper to cover the box. 


Now on each side of the box using a 3/4" circle
punch to punch out a half circle.  This will make 
your globe sit nicely right on top of the box so you can see
the inside of the cabin.  
Add your snow and glitter if you have some. 
Put the lid on top and add the globe to the box.
I added a little tag on the front.  Remember.
if you see something you don't have you can 
check and see if you have something similar.


So cute!
The plastic ornaments (globes) can be found at Michael's
or your local craft outlet.   Let it snow!


Friday, December 3, 2021

Reindeer Wood tags


How about some cute little wooden tags to add to your
tree, or gifts or bottles of bubbly or wine to gift?
These are those wooden tags I shared a few posts back from 
Michael's.  You get 50 of these for $5.99
Such a great price!


I used the new scrapbook designer series paper called 
Peaceful Prints.
Cut the paper to fit your tags.
Glue the paper to the tags and add the cute little reindeer
head   


You can find the little reindeer heads at Hobby Lobby.
Cut yourself some small 1/4" tags and stamp them with 
a Christmas saying. 
When they are all dry add, sand the side of the tag and add some jute cording to hand them.  


Here is the link for the wood tags. 


Wednesday, December 1, 2021

Christmas Tree yarn sign


How cute is this little tree?
I've been hosting monthly classes here in my home again and this
will be a project for the ladies coming. 
I picked up these wooden pieces at Hobby Lobby for $1.79


The sign originally came looking like this except
they all had different large black monogramed letters that I ended up 
sanding off and repainting them white. 
How to make the tree;
Start with your olive yarn, wrap it around your fingers
looping it about 14 times to create the little tassle, tying it off just at the top with a small piece of yarn.
You will need to make three of them to construct your tree.
Once you have them made start by hot gluing your tree trunk wood piece down first then glue the tassles down on top of each other.
Add your bow and stamp the "merry and bright" at the top


Super cute little tree!


Monday, November 29, 2021

Wooden Christmas Tags


Get ready for some cuteness overload!
I happen to be in a Walmart most recently and walked through
the Christmas aisle and found these adorable ornaments.


It was hard to choose the ones I did pick!
There were so many more styles to choose from.
I ended up with the ones I am sharing with you. 
each one gets even better!


Little wooden houses....


Cute little reindeer.....


handlettered discs.....


I found these packages of wood tags at Micheal's,
you get 50 of them in the package for $9.99,
if you use a coupon you can get them for 40% off.

Wood tags are on sale! Snag some!


Using some scrapbook paper I covered each tag using
some glue.  
Take your little charms and decide which ones will be on 
what card stock design.   


For the faux wood one I added the little house
and some white ribbon. 


Here are a couple more....
super cute little deer.


Once you've made them you can use them on your packages
or add them to a bottle of wine or apple cider or hang them on your tree!


Saturday, November 27, 2021

Diy front door Swag


Let's kick off this black friday with a fun and affordable 
holiday swag you can make for your front door or used 
in your home holiday decor.
I started with this beautiful green swag I found at Home Depot
all of $6.98 for four different greens.


It comes all nicely bound with rubber bands and packaged for you.
You actually could just decorate it as is but I really wanted to spread 
out the swag to make it fuller and longer.
I took apart the greens and reset them how I wanted them to look then used floral wire to bind the back together. 


Now your ready to decorate!
The fun part!
I had picked up these harmony bells a few weeks back at Home Goods, if you can find any there, here is a link to Amazon for you
to look at some there.
The ribbon trim is a beautiful rustic mustard that is velvet and frayed on the ends.  This I found at Walmart.
First tie your trim at the top of the swag around the wired or rubber banded area.  Then take your bells and attach them with either
wire or jute.   Literally that is it.
The swag is hanging from my door on a hook by one of the larger
branches on the swag.
I hope you try this!   So fun to kick off the season with a fresh door wreath!


Loving it!