Wednesday, April 29, 2009

Twitter Bird!


I was on my twitter page and thought that the little blue bird was so cute and so it inspired
me to make this little birdie twitter card. I used the SU! leaves die, the chipboard for the bird
and the Cutie Pie designer paper. xoxo

Tuesday, April 28, 2009

More Gingham......


I know! I know! First it was polka dots and now gingham! I will try and challenge myself
tomorrow to try something different! I did incorporate a bunch of accessories in this card,
you can see I used the Big Shot Daisie Die, the new very large white grommets, the scallop
punch both oval and scallop and then the embossing envelopes. The middle of the daisie
is red grosgrain ribbon tied into a knot. xoxo

Monday, April 27, 2009

Cute Little Baskets


Aren't these the cutest! I found the video on how to make these of all places on youtube.
http://www.youtube.com/watch?v=0dhZXCYtvxA You can follow the directions from there.
These are great as they use up your scraps, they are quite small. I know hard to tell by the
photos. But once you get started you will be making a plenty! Not only for Easter, but
for little gifts, luncheons, showers you name it. x0x0

Saturday, April 25, 2009

Templates for Gift Card Ideas...


Well finally I get it posted for you! LOL! You can either copy this right on your copier and set on an 8 1/2 x 11 sheet of cardstock or just follow directions in the photo. Now the third small
square gift card holder directions are cut a piece of cardstock 5 1/2 x 4 1/4 score at 1 1/2 on
one side and 1 1/4 on the other. Fold up use the corner rounds on all sides and then decorate.
Remember on the inside to adhere one side down so that you can slide your gift card in. Refer
to my sample post. Have fun ladies! xoxo

Friday, April 24, 2009

Teacher Appreciation


I'm sure many of you are gearing up for the annual Teacher Appreciation week at your local schools. I put together a card kit for one of our Teacher's to suprise her with. It is nice to
hear from the Teacher's that they do love receiving cards from us, so get cracken and start
stampin your favorite Teacher some cards! xoxo

Thursday, April 23, 2009

Gift Card Ideas


Here are a few Gift card ideas I have put together for Teacher Appreciation or Mother's Day
or whatever you decide! So sorry my photos are less than desirable lately. They are taken from
my bed so there you have it. Anywho, there are three pictured and the first is a little purse,
the second a folder that holds hershey's chocolate sticks and the third is a smaller gift card holder. All are made with the Gingham paper, So Saffron, Baja Breeze and White cardstock.
I will post the templates later today for you to follow... x0x0


Wednesday, April 22, 2009

Knee Update...

Well, saw the knee surgeon today and was told that the fracture to my knee cap and LCL and
MCL are not quite healed, therefore no surgery on the 28th. Instead I will be starting a 3 week
process of rehab at physical therapy to strengthen the torn ligaments and try to begin walking
without the crutches but a brace. Then after 3 weeks revisit surgery to reconstruct the ACL.
I have so many injuries to the knee that it is going to take steps in order to get the knee mobile
again before he can do the ACL reconstruct or I will not get back mobility as it once was.
I guess in one breath it is good news and the other, it makes it a little more drawn out. A good thought is that I will hopefully be without crutches within a week or so. Keep your fingers crossed for me! I will be posting some really cute Gift card ideas tomorrow morning, the lighting is horrible tonight! Thank you for all the well wishes and encouragement! xoxo

Monday, April 20, 2009

Mother's Day Tote Bag


Mother's Day is just around the corner! Here is a tote bag that I have decorated by using quite
a bit of the punches. The daffodil center is made with the scallop punch. I punched it out in apricot appeal, then cut into the center and adhered it with glue, then inked up a dauber and
added some shading. Then for the petals of the daffodil I used the large new oval punch from
SU! and then the regular sized one for the smaller petal inside. Who said a ladybug has to be
red! The ladybug is also made with the large oval punch throughout and the wings are cut from
vellum and attached.
Mother's Day is always so bittersweet for me, I am so fortunate to get to share and spend it with my girls which I am so grateful for, but I miss my Mom so much! She passed away 14 years ago from Breast cancer and as much as our Mom's irritate us! ( You know what I mean ladies!) once they are gone you sure miss them irritating you! but mostly their love of course! Here's to all you Mom's out there! xoxo

Sunday, April 19, 2009

Darling Daisies


Don't you just love the new SU! Daisie Die! I have layered it here to give it a much more 3D
effect than if you just were to put the three layers together. The paper used is So Saffron,
Baja Breeze and the ever popular Urban Garden Designer Series Paper. Love It! I also incorporated the new cordouroy baja breeze buttons and the new Eyelet Border punch.
Pretty stinkin easy card girls! and all from my lowly little bed! LOL! xoxo

See Ya Later Faux Alligator!


Don't these look real! These are the cutiest little wristlets and so easy to make and do. Use them for upcoming teachers appreciation, bridal showers, gifts, fill them with gift cards or of course chocolate!
I have updated this post as many have emailed me to repost the purse instruction, as the flap
of the purse is a tad different from my post March 9th, so here is a photo of the purse again with
the change in the lid. Credit where credit due!: The Faux Alligator technique can be found here at http://jackietopa.typepad.com/FauxAlligatorSkin.pdf .
You will cut out all your pieces and score them. This will require you to own a Big Shot. You will use the Top Note Die and cut three of them out. Follow the directions above to see how to score and cut them. Again you can refer to my March 9th Purse instructions to finish the rest. If you do not have a Big Shot let me know! I can order one for you!
Now, when you do the faux technique you will need to emboss all three top note pieces by first
stamping them up with versamark and then adding clear embossing powder. Take your bone
folder to create the lines BEFORE you emboss it. Shake off excess and the emboss. Wala, faux
technique. Have fun with these! x0x0


Thursday, April 16, 2009

Branching Out


This tree stamp is from the SU! Branch Out Set. I attached a bunch of the SU! coordinating buttons to it then added the Red Riding Hood ribbon. The punch is the new scallop oval punchaccompanied by the regular oval punch. Simple yet lovely as a tree! x0x0

Gingham Good Friends


Here is a card set I put together, I decided I am challenged by the new in color Pacific Point. I have had it for months but every time I look at it I just put it back! I finally decided it was time
to get it out and use it! The cards are made with the Good Friends bird stamp and also so tweet
chipboard birds. The cardstock is Sahara Sand, Pacific Point and Gingham paper. I used the background stamp from the Boho Background stamp set. The folder itself is a full sheet of 8 1/2 x 11 folded on the landscape side. Fold it in half and then cut it down to 4 inches. that will
complete your pocket. xoxo

Monday, April 13, 2009

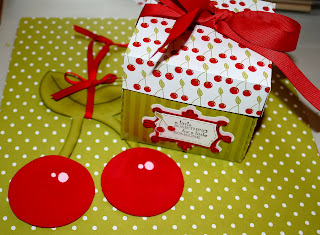
Explosion Cherry Scrapbook Box!


Okay Ladies, here is my most recent creation from my bed, so sorry the photos arent' the best but I can only photograph from where I lay.... oh well!
Anywho, this is a large 12 x 12 scrapbook explosion box! Love it! Now you can either use it
and fill it up with photos and journaling or make pockets like I did and write in inspirational
quotes and then fill it up with my personal fav- chocolate! Anyway you do it up you will find
it quite easy and quick. Let me know if you have questions. I found the template at SCS but
here are the measurements for you.
1 Sheet of decorator paper - 12 x 12 scored every 4 inches on each side, then cut out corners
1 Sheet of cardstock - 10 1/2 x 10 1/2 scored every 3 1/2 inches on each side, then cut out corners.
1 sheet of cardstock - 9 x 9 and scored every 3 inches on each side, then cut out corners.
For the lid: cut at 7 x 7 and scored it at 1 3/8 on each sides, (to fit the 12 x 12 layer closed)
Stamp and decorate each layer for either journaling or scrapbooking. The entire box folds
up and is held together with the lid. Be creative in how you decorate the outside of the box.
I came up with the cute cherry tag to add to the top.... Have fun with it! xoxo

Saturday, April 11, 2009

Bella Rose.....


The upper card is made with the SU! Bella Rose paper and Park Avenue Stamp Set. The rose and lily were watercolored with red riding hood ink with the Aqua Painter. Below is another
Top Note Die purse with three 3x3 inch cards that fit just perfectly into the purse. x0x0

Friday, April 10, 2009

Cockadoodle Doooo! Rise and Shine!


Yes, I managed to get my family to bring my craft table and all my goodies to my bedroom! I am back in action! High Maintence? Moi? No way!
Here are a few cards made with SU! Rustic Rooster set. The colors are Red Riding Hood, More Mustard, Basic Black and White. I also used on all three cards the new embossing envelopes for the Big Shot from SU!. I took more mustard and close to cocoa with daubers to give the stamped
images that rustic look. xoxo

Tuesday, April 7, 2009

Knee Update.....

As I said, a drum roll please!.... I just recieved my results on my knee, I have torn my MCL and ACL and have scheduled surgery for April 28th. The reason it is out so far is the fact that the MCL has to heal first in order for them to opeate on the ACL. 6-8 weeks recovery. That's right! no walking, driving you name it, I am trapped like a sewer rat! But..... the good thing is maybe I can craft from my bed! Oh yes, if there is a will I WILL find a way! LOL! Thanks to all of you that have sent me well wishes and such, it is so appreciated! and watch for more posts, they will show up soon! Working on some things..... xoxo

Sunday, April 5, 2009

Fun and Snazzy String Spinner Card

Here's a fun snazzy little card I whipped up from my bed! The large mustard circle to the right is on a string and twirls, The 3 cirlces on the card are punched from 1 3/8 punch. I used rub on's for the sayings and also the large flower. The sets used are the Doddle This and Polka Dot Paisley. Hope you like it XOXO


Thursday, April 2, 2009

Tweet, tweet, tweet


Love the SU! 24/7 set, one of my favs. Here is a very easy to do card. The center tag is made
with the stamp from the gallery set. xoxo

Suprise Pop Up Brithday Card


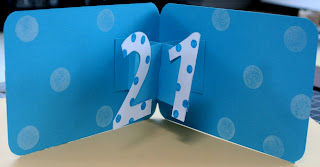
Well last week before my ski incident, I had been making quite a few pop up cards, here is another one that I finished. I used one of the SU! hostess sets for the front part and added
some crystal effects to it to make them pop. When you opened it the 21 pop right out at you!
Have a great weekend, hope to post more soon. xoxo

Easter Wagon


Well I have been trapped in my bed all week and had my MRI today, results in 48 hours I hope!
Here is a little Easter wagon I started last week, I had good intentions of filling it with stamped
goodies but instead just stuck the chickie in it for now. I know you have seen him posted before
but he does look cute in there. The wagon is made from one of those little metal boxes from the
dollar spot at Target, cover with the awesomes DSP Sale a bration paper and then the wheels
are made from chipboard run through the Big Shot, adhered with the cropadile and some large
rivets and rhinstone brads. The handle is cut from a 1' strip and two pieces of the oval punch
and attached with brads. Hope you like it! I AM MISSING MY CRAFT ROOM! xoxo