Friday, September 30, 2011

Sweet Pressed Cookie Stamps!

Good Morning Stampers!  yes,  you read that right!  Cookie Stamps!  They are here and ready to order.  The easy-to-use cookie stamp has a solid wood handle with three interchangeable stamp images: a heart, a jack-o-lantern, and a snowflake.
Just make your favorite shortbread cookie dough (or one of the two included recipes) and stamp away! Create beautiful, hand-stamped cookies in a flash. The stamp images are completely food-safe and child-friendly.


You can order your cookie stamps HERE
#125152 -  $16.95


Halloween Petite Pocket Holder

How cute is this!  I received this at convention and have been holding on to it to share with you!  It is made with our new Petite Pocket Big Shot Die!  I don't know who made this as there is no name, but it is just adorable!


Recipe
Stamp Set:  Scaredy Cat # 122555 W or # 122557 C
Paper:  Old Olivc, Pumpkin Pie, Basic Black, Whisper White
Ink:  Basic Black
Accessories:  Petite Pocket Die#123131
  1 3/4' Scallop Punch #119854
1 3/4' Circle Punch #119850
Glimmer Brads (black) #121003
Word Window Punch # 119857
Baker's Twine in White # 124262
Orange Rhinestones

Wednesday, September 28, 2011

Pick Your Poison- Halloween Magnets

Good Morning!  I'm getting ready for some upcoming kids stamp classes and was trying to think of a fun idea for them to make.   I got out some metal boxes I have had laying around and decided they are going to make some Halloween Pick Your Poison Magnets.  Here's what I did,  easy as pie ladies1  Take your Pick Your Poison DPS and stamp your images onto the paper and cut out.  Now take magnetic sheets that have self adhesive backing and stick the images right onto the sheets.   Measure the inside of your box and add some Pick Your Poison DSP paper inside.  I made a belly band to fit the outside of the box.   The magnets stick nicely right into the box and stay in place so you can see them.


Monday, September 26, 2011

Vintage Crow Class

                           Reminder!  Vintage Crow Class!
I have had many emails asking whether it is ok to sign up for the class if you are a SU! demonstrator, yes!  of course!  just email me to reserve your  name, I have spots available.    
   
                             Bring a friend and receive a gift!


You will be making this Vintage Crow
Date:  friday, October 7th
Time:  10am -12pm
Cost: $12.00
email me ASAP to reserve your place!

Going Batty with So Shelli

Today's post is directly from our fearless Leader's blog,  So Shelli  HERE   It is so cute!  she did a great job! It is made with the Petal Cone Die!
Check it out so you can make one!

Saturday, September 24, 2011

Many Mustaches

   Good Morning Stampers!  How cute is this new Many Mustaches set?  Here is a fun idea for your little treaters for Halloween or even the classroom.  Party idea?  you get it...   Here's what I did with it....

Go get a bag of Dum Dums (super cheap and you get a ton!)
Stamp the mustaches on whisher white cardstock, punch a 1/8' hole punch in the center and slide onto the candy.  There you have it....
and here's my daughter modeling it for you!  too cute huh?


CLICK HERE to order Many Mustaches # 122917  $9.95

Thursday, September 22, 2011

Candy Corn Petal Cone Treat Box

Good Morning Stampers!  Looking for a cute little Halloween treat box to make?  I saw this idea on a website and thought I would try it with our Petal Cone die and it works great!  All you need to do is punch out the die in whisper white, fold all up and
put together except for the bottom.  Now take your double sided Sticky Strip and start at the bottom and do 3 rows of strip all the way around the cone.  Now add the SU! Orange glitter.  Now move the the next layer and do 2 strips of adhesive and add the Gold SU! glitter.  I topped it off with a scallop tag and stamp from the Spooky Bingo Bits set and added a Basic Rhinestone.


Ingredients:
Cardstock:  Whisper White Creamy Caramel, Pumpkin Pie
Accessories:  Petal Cone Die, SU! Glitter in Gold and Orange, Basic Rhinestones, Sticky Strip, Scallop Punch, 1 1/4 circle Punch, 1 3/8 circle punch, Ribbon of choice
Stamp Set:  Spooky Bingo Bits  W- 123944 or C - 123946

Monday, September 19, 2011

Vintage Halloween Crow

Happy Monday Stampers!  For any of you who have Stampin Up's!  new Holiday Mini, you might have seen this Vintage crow lurking in theshadows!.  I decided to take a stab at him!  I purchased the crow at the Dollar Tree and used our new Pick your Poison DSP.    Isn't he fun?  Wanna make one?  There will be a class here at my house to make one on friday, October 7th!  So save the date and watch for details, or email me if you want to sign up.  The class will cost $12.00 and be from 10am- 12pm.    Come make some Halloween fun! 


Friday, September 16, 2011

Spooky Bingo Bits


Happy friday stampers!  Love this new Spooky Bingo Bits stamp set,  are you looking for a cheap and easy classroom idea for Halloween or just plain fun way to decorate some goodies.   I found this rather large bag of Sixlets candies at Target for $5.99.  You get 110 pieces!  and better yet they are orange and black!  You probably are wondering why I have made all these so early, well I have a kids stamp class coming up and these are there treats as well as one of the things they will be making.

                                         Here's what you need:
                                                                  Stamp Set :  Spooky Bingo Bits
                                               Cardstock:  Basic Black #121045
                               Designer Series Paper Stack- In Color # 117158

             Have a great weekend, get some crafting on!

Wednesday, September 14, 2011

Ekk! burlap picture

 Good Morning stampers!  Here's a fun and easy Halloween decoration for you to make....  I picked up the frame at the Dollar Tree and some burlpa from the fabric store and the mini spiders...


Here's how you get started.... take out your Big Shot and the Serif Essentials alphabet die. I have used the word Ekk, so go ahead and punch out your letters.   Take the reverse image and put on top of the burlap.  Starting with some black arcylic paint and a sponge brush and use the letter as a stencil.  Paint out your words and let dry.


Next, take out a sharpie and draw the spider web in the corner.  Add your mini spiders with the Tombow ahesive glue.
Take out the new Dazzling Details glitter glue and add to the web.  Now to spooky it up a bit I took the Silver Foil Smooch Spritz and sprayed it all over the burlap.   If you need a bit more help, there is a video tutorial to purchase below for $3.99


Monday, September 12, 2011

Seeing Pink Elephants

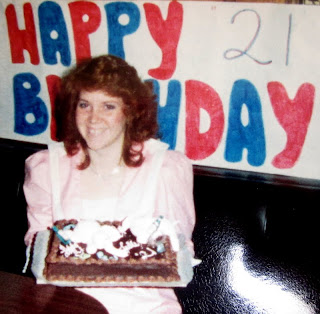
My Niece is turning 21 this wednesday so I had to pass on an ole' cliche' my Mom used to say to us girls once we all turned 21, there are 5 daughter's in my family.  Her saying when turning 21 was:: " don't see too many Pink Elephants!"  meaning of course, don't drink too much!  My Mom has been gone 16 years now and I miss her daily,  but love to keep her spirit alive by doing all those fun little things she did for us. 

Here the card for her with the "Pink Elephant"
Stamp Set: Elebration
Cardstock:  Whisper White, Pink Pirouette, Beau Chateau
Accessories:  Glimmer Brads Subltles, dazzling diamonds

And now here's a good laugh for you! 
Here I am at the 21st birthday party my Mom threw for me.  I am wearing a hidious pink jumpsuit and that hair...well, don't say a thing!  and there thou and behold is my "Pink Elephant" cake,  it's hard to see but the cake has pink elephants laying all over the cake!  Of course this picture was taken just 8 years ago, since I am 29!  hahaaa!    Boy I miss my Mom! 


Saturday, September 10, 2011

Pick Your Poison Hand Soap

Good Morning Stampers!  I am on  a Halloween roll!  Today's post is another way to spruce up your house Halloween style. I purchased a hand soap from Bath and Body works,  this one is the White Citrus as it is green.  Below are the "ingredients" to make this spooky little guy.


Cardstock: Pumpkin  Pie, Basic Black, Pick Your Poison DSP
Ink:  Basic Black
Stamp Set:  Pick Your Poison, Spooky Bingo Bits
Accessories:  Mini Vintage Tags, Basics Glimmer Brads, Decorative Label Punch, Pumpkin Pie Striped Grosgrain Ribbon

Thursday, September 8, 2011

Pick your Poison- Hand Sanitizers

Back with some more Halloween fun today!  I found these anti bacterials at the Dollar Tree.  What I liked is that one is purple and the other is green, perfect for Halloween!   Here's what the package looked like below before I got my craft on.


I used the Pick your Poison Designer Series Paper to decorate this set of spooky Halloween images. 
.


Up close, doesn't the spider look real!  The front label of the anti backterial soap just peels right off. I traced the origninal size onto the DSP paper then stamped all my images and glued them to the front , added some pumpkin pie ribbon.  I also decorated the orginal box.


On this one I made it more cutesy,  not so scary.


Hoep you like them!  xoxo

Tuesday, September 6, 2011

Wicked Cool

Let the Halloween fun begin!  Over the next 5 weeks I will be posting a lot of Halloween projects and cards for you!  I am sooo in the mood for Halloween!


This card is a stretch for me,  pretty glitzy but fun!
Recipe:
Stamp Set:  Wicked Cool -  (W) #118738    (C) #120600
Cardstock:  Peach Parfait, Basic Black, Whisper White
Accessories:  On Board Merry Medley # 122958
Striped Black Grosgrain Ribbon # 115615
Stampin  Glitter- Fine Galaxy #114286
Two Way Glue Pen
Ink:  Basic Balck and Peach Parfait

Let the Spooky times begin!  Muhwahhhaaaaaaa!

Monday, September 5, 2011

September Papercrafter's Sampler is Here!

It's here!  your September edition of the Papercrafter's Sampler with all your back to school idea needs! 
 Go HERE to sign up for the publication
Hope everyone had a wonderful Labor day weekend, well rested and ready for school to begin again! 

Here is a sneak peek of my card.......xoxo

Thursday, September 1, 2011

Holiday Mini is Here!

It's Here!  The Holiday Mini is now live and ready for you to view and order from!  The next fews months will be all about  Halloween, Thanksgiving and Christmas cards and ideas,  I cannot wait to share with you!  Now grab your cup of coffee sit back relax and score over all the new products we have for you to create some incrediable projects and cards for your family and friends!

                                  Click HERE to view Holiday Mini
                                     Click HERE  to order items

                        Here's my card for the day... getting ready for my favorite
                                            HALLOWEEN!  MUHWAAHHH!

I have some kid's classes coming up and this is one of the cards and goodies they are going to  make.  The first is a basic card and the second one is an envelope that I have folded over, when you open it inside is has these cute little Halloween bandaids that I found in a dollar bin!  Thought it would be fun for them to make.  Below you can see once you open it how the bandaids fit just perfectly inside the side of the envelope.  And it wouldn't be complete without Boo Boo on the side!    Below gives you the products and information you need to made these two projects.  Muahaaaaaa!


The Card:
Cardstock:  Lucky Limeade, Pumpkin Pie, Eggplant Envy, Whisper White, Designer Pumpkin Pie
Ink:  Eggplant Envy, Pumpkin Pie
Accessories:  Mini Jingle Bells from our new Holiday Mini- Great price!  $2.95 for 48  # 124116
Square lattice embossing folder # 119976 - $ 7.95
Stamp Set: Jack of All Trades  (W) #122620 or (C) 122622 and Spooky Bingo Bits # 123944 (W) or (C) 123946

The envelope front is made just the same but the envelope is a basic envelope that you will fold in half, open and at the top of the envelope cut the fold over part of the envelope down the center. ( you can see it in photo), then adhere the left side of envelope being sure to leave the right side open for your bandaids to fit.  Now decorate!  If you have any questions, email me @ juliepitta@rocketmail.com  Have fun!