Sunday, November 27, 2016

Christmas Hanging Wreath


Gosh, I've seen these gorgeous wreaths all over the place hanging from the kitchen table and thought I might give one a try.  
I started with two of the same wreaths (I had mine on hand) that were already decorated with berries and ribbon, so I didn't have to add anything to them.  (always trying to upcycle!)
I used wired to fit them together with their backs to each other as you assemble them.  
Cut yourself three pieces of  ribbon that will match your wreath.  Mine is red and each piece is cut at 18". You may have to cut yours longer or shorter based on the height of  your ceiling.  I have low ceilings. I used a glue gun to attach to the bottom of the first wreath. 
(you can kind of see this in the above photo)
Bring all three pieces to the center and tie in a knot or bow.  
I have a j hook that is always above my table to hang things, so I just hung mine from it.   


I added some of those little elegant rice lights to it too.
Below is an idea for your table.  Who doesn't LOVE the old vintage Ball mason jar with the closure and lid?   
Fill them up with water and a floating candle, put on a charger plate and add some greens and there you have it!


I hope your already beginning to deck the halls and walls of your home sweet homes, I am just getting started, SLOWLY......

Friday, November 25, 2016

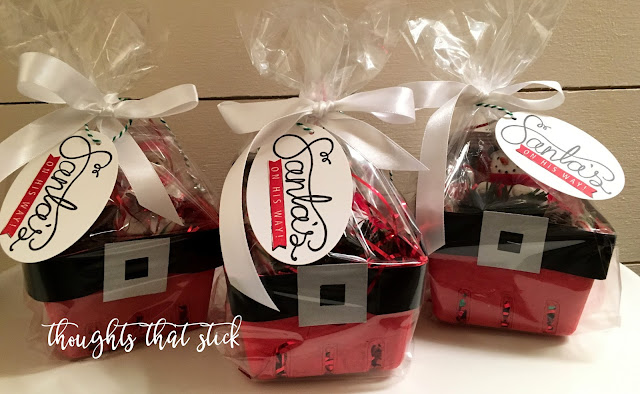
Santa Pants


Getting things ready for upcoming events and classes. I made these Santa pants by using some red berry boxes.  Added black cardstock cut at 1" x 8" and stapled it around the box.  
You create the buckle by first punching out the 3/4" square, then the 1 3/4" square using silver brushed cardstock. 
 Now filler up!  drop it into a gusseted cell bag, add some ribbon and a tag. 


Hope you all had a wonderful Thanksgiving. 
It was great to have family all come together and enjoy just being together, with no distractions. 


Gratitude unlocks the fullness of life.  It turns what we have into enough, and more.  It can turn a meal into a feast, a house into a home and a stranger into a friend.  
Counting so many blessings........


Wednesday, November 23, 2016

Winter Wonderland


November's paper pumpkin is here and it's a beauty!
Look at these silhouette's!  such beauty.
I tend to alter my paper pumpkin, so here's my simplistic version for you. 
 I just layered each piece and then added the glittter, that's it!  


Here's some more wonderful ideas for you to glean from our Stampin' Up! blog


NOVEMBER PAPER PUMPKIN WONDERFUL WINTERLAND

We love all our kits, but we are especially excited about the Wonderful Winterland Kit! We changed the box to match the kit, it’s holiday cards, includes two Classic Stampin’ Spots, and it’s unlike anything we’ve done before in Paper Pumpkin. The laser cut pieces are similar to Edgelits and give the cards wonderful depth and character. As you layer the houses and trees with dimensionals, a lovely little landscape takes shape and helps you feel right at home for the holidays.

PP_Nov_Intended_Use
And since we know it’s on your wishlist, here are some more projects for you to try. (Because ideas are just like presents under the tree; the more the better!)

PP_Nov_4
First up is something you can make with the contents of the kit if you decide to make something different than traditional cards. It’s a tiny little treat holder that is just about the most adorable thing you’ve ever seen! Use a card base to make a matchbox-style holder and slip in a peppermint pattie. It’s the perfect little treat for a friend or loved one.

PP_Nov_3
You know those days when all you want to do is sit by the window with a cup of hot cocoa and watch the snow falling outside? That about sums up this shaker card. Use your Big Shot and some fun supplies like the Layering Squares FramelitsFoam Adhesive StripsMica Flakes Trio Pack, and Window Sheets to recreate this beauty.

PP_Nov_1

If the weather outside is frightful, stay in and stamp this next card. Use the Softly Falling Textrured Impressions Embossing Folder and Layering Circles Framelits Dies along with a touch of silver ribbon from the 3/8" Glitter Ribbon Combo Pack for a card that’s sure to warm someone’s heart this season.

PP_Nov_2

Monday, November 21, 2016

Oh Deer


Yep,  more deer.  I told you!  lovin the deer vibe this season. 
 As I have said, I really like to use and show you how to use what you have bought.  This beautiful vintage paper Home for Christmas is still in my studio shouting out to be used. 
Now,  I did not come up with this card.  I found it on pinterest and had to case it. I would give credit where credit is due, but have no name.  So shoutout to whom designed this... LOVE it!

Saturday, November 19, 2016

Thanksgiving decor


Sharing a little Thanksgiving decor that's starting to come together at the Pitta household.  This month has literally flown by!
I have a full house coming for Thanksgiving and couldn't be more excited.  I just have to get rollin!
Any fun traditions that you can share that you and your family make or celebrate for the holiday?


Thursday, November 17, 2016

Nugget Treats


Sweet treats!  these little nugget treats are fun and easy to make.  
I used the new Candy Cane Lane designer paper as well as the retired Home for Christmas paper.  I believe in using all my paper and being able to show you how to use what you have purchased. How many things do you have sitting in your craft spaces you have yet to use?   See!  Let me help!
The candy are the Hershey's nuggets.  Cut your paper at 1" x 3" to wrap around the nuggets.  I just adhered it with a glue dot.
The cello bags are new and the size are 2 x 8" 
#141703 item number, you get 50 for $3.00


With both the papers I cut out the Santa and Gingerbread house and adhered them to the packages
Sweet treats to have on hand.


Tuesday, November 15, 2016

Oh Deer!


There's a lot of holiday happenings going on over here.
I made these wood deer ornaments for the Seattle Symphony fundraiser coming up in December.  I was able to cut some birch wood down while over in the mountains.  
I was able to find these adorable wood deer heads at the local craft store and easily put them to use. 
I have this fascination with deer this year!


Sneak peek!
Mark your calendars for friday, December 2nd
The hanging white washed deer below is one of the fun creative items we will be making that morning.
It is scheduled for 10am to noon
Register early as this one will fill up quickly!


Sunday, November 13, 2016

Candy Cane Lane


Holiday happenings are everywhere!
I have noticed so many people are already putting up their Christmas lights and on social media decorating their homes.
It's good to see some good cheer this week after all the happenings throughout our nation.   People are searching for hope and happiness and I think finding refuge in the upcoming holiday.


This is a quick fold over card that I hand cut at the bottom.  Add a strip of 1/4" of cardstock at the bottom and cut out the cute gingerbread house. 
  The paper used is from the Candy Cane Lane suite line.

Speaking of finding refuge.
  I snuck off to the mountains friday for some time away. 
 It's right before we will start to get our big snowfall.
  Prediction is next week, which means moving forward 3 to 4 feet of snow on the ground until spring.
  I love it! 


I did my typical hike that I love. 
 You have seen me post many pictures from this place. 
 Here it is before the snow pack.
  I truly love to get away here for refuge and restoration. 
 It elevates me beyond words. 


In honoring our Veteran's I stopped by our local historical cemetery only to find I wasn't alone.  
 The local deer where there already resting and keeping watch.
One beautiful doe, mind you she let me walk right up to her get this picture. 
  So surprising she didn't run off.


I turned around and there was her Stag!  staring me down.


Honoring our Veterans


This is the view as I sat on the side of the mountain looking down to the river below.   Ahhhhh......


More deer, nibbling away
There!  I helped you get away with me for a quick minute to the mountains. 
Hope you enjoyed!


Friday, November 11, 2016

Jar Of Love


It's friday!  
and for you I have the last of the three shaker cards I created with the Jar of Love stamp set.  All three cards are shaker cards with different mediums in each card.  I used mica flakes (fake snow)  snowflake confetti and silver sequins.  You can get creative with what you have on hand to fill your mason jar. 


On this card I used the silver sequins and snowflake confetti.


Wednesday, November 9, 2016

Jar of Love


Round two of a another shaker card.  This one has the pretty pine in the center with mica flakes (snow) inside the mason jar. 


Monday, November 7, 2016

Jar Of Love


Spreading a little Christmas cheer for all to hear!
Here we go!  the holidays are fast approaching.  The next few days I'll be posting a few shaker cards made with the Jar of Love stamp set.  It's full of mason jar goodness!  So if you love the new trend stay tuned for some holiday ideas to get you getting creative!


Saturday, November 5, 2016

Creative Class


yesterday I held a creative class, here are a few things we made.
Above, a white washed vintage fence post "gather" sign


and these chicken wire votive candles


and these hand stamped birchwood ornaments.


a few of the lovely ladies who "gathered" to be creative.
(a few of you that came left before we could get a group pic)


It's all coming together......


looking so serious!


Next class is scheduled for
 friday, December 2nd- check back for details