Saturday, December 30, 2023

New Year's table decor


Here we come 2024!
Who's ready for a new year?
Yesterday I got to host a birthday party for a friend who was born on New Year's eve (of course we were celebrating early!)
Since my gf loves karaoke and disco balls so we HAD 
to decorate with all the bling!


I decorated the table with a white gauze runner 
and a bouquet of baby's breath, some candles and
some disco balls. 


I even found her a disco ball headband!
Everyone had a temporary tattoo on their 
plates with encouraging words. 


The table is now switched over and ready for New Year's~
Do you make new year's resolutions? 


Wednesday, December 27, 2023

Gingerbread house competition


Sharing some fun we had merging our new SIL to be's family,
they had us over for dinner and a gingerbread house competition. 


We broke off into groups of 3 and created the house
that was given to us.  We were given the donut shoppe to put together
and decorate. 
 We had a total of 45 mintues to construct and decorate the houses. 


Here are all three constructed,
a beach shack, donut shoppe and barn. 


They turned out so cute, everyone did such a great job. 


The beach shack and the donut shoppe


Everyone was a winner! 


Monday, December 25, 2023

Merry Christmas!


Merry Christmas from our house to yours!
Enjoy every ounce of the holiday season!

Friday, December 22, 2023

Christmas Tablescape


Sharing how I will be styling my christmas dinner
table this year.  I have been loving the idea
of the whole gingerbread house theme.
So I used what I had on hand to make this come to life.


The little gingerbread houses I made out of small pieces of wood that I drew on with a white uniglo pen to create the little house. 
I have rosemary growing in the yard so I added some to each place setting. 


I looked around to see what I had and starting building from there.
Using a wood tray I had, some clear candles, the candy canes and little gingerbread cookies someone gave me and the greens I had from years past for decorating the tray. 


I had this cute white gingerbread house I purchased at HomeGoods
last year and set it in the center of the tray and built around it with
the other pieces.  
Very cutesy, I'll take it! 

Wednesday, December 20, 2023

Santa treats


Ho Ho ho!
I made up these little santa treats that my bff in spokane showed me. 
They are so adorable and easy to make.
You can take these to friends, teachers, girlfriends, etc. 
I filled these little treat holders with some chocolate santas. 


You can add any cute holiday image, I added some glitter
to the brim of his hat and the pom pom.


To make this little treat holder cut a piece of white paper at 8 1/2" x 2"
using a tag punch, punch both ends of the holder.  Now score
the piece of paper at 3 3/4" and 4  3/4".
Set it aside.
Now take the scrapbook paper and cut it at 2" x 7" and score it at 2" and 3"  and 5" x 6".  Fold both of the pieces up and put them together with some adhesive. 
Add an image to the front and tie it off with some baker's twine.  

Monday, December 18, 2023

Annual Christmas Gather


Happy monday!
Our annual girls Christmas gather was this past weekend and it never disappoints.  I believe it is our 22nd year.   Most of our girl's are grown up now and live it other states sadly.   There were still 8 of us at the party, we missed our girlies who couldn't be with us. 
The party theme was pajama and waffle party. 


Everyone in their jammies~


We always take mother/daughter pics
this is Brittanie and Terri 


I decided this year to do the pajama/waffle party,
but the tabledecor and crafts were a gingerbread house
theme.   I made the above gingerbread house by cutting out 3" wood pieces and cutting a 45 degree angle for the roof line. 


\

Shenanigans are part of the day and we never miss out on playing
 some games.  This first game are votive candles that you light and then take a crack at blowing out as many as each participant can do!


So much fun!
The highest we were able to reach was 8!
But we did try!


And this one,  mound a pile of flour on the table, top
with an egg then using a chopper each participate
cuts away pieces of the flour without the egg dropping.
Whoever drops the egg loses. 


And this one you must try!
roll out rolls of tp and set a small cup with whatever type drink you'd like.  The participant slowly rolls up the tp without spilling the drink.
First one to reach the cup to themselves and takes a drink wins!

Hope you've enjoyed coming along with our day! 


Saturday, December 16, 2023

Grinch Ornament


Happy saturday!
Are you running around getting ALL the things accomplished today?
or home baking, or working..... or....... creating?
No,  it's not Halloween creating again, but these witch's hats and ghosts have turned into the Grinch!
Take a look at what you can do with them.


Start with some acrylic paint,
I chose a red, white and green, any shades will work.
Also pick up some wood beads for the nose and tip of the hat.


Begin by painting the face green, let dry a bit before
moving onto the trim of the hat which will be white,
then finally the red hat.  I used a toothpick and slid the beads
onto it to paint them green.
Once all is dry hot glue the hat to the head and the nose and bead on
the tip of the hat.
I grabbed a cotton ball and stretched it out to fit across the brim of the
hat and added the little nosegay beads.
Use a black sharpie to create your mouth. 
So fun and festive!!
Send me your pics if you try this out!


Thursday, December 14, 2023

Creative Class


Another creative class in the books!
Yesterday this group of amazing gals came over for some
creative time. 


They made the paper angels and the O Holy night signs
as well as wooden ornaments and glass ornaments.
I will post some more photos so you can see the projects.


See the embroidered towels?
One of the gals made and brought these for everyone.
So beautiful!


They also made these Merry and Bright chalkboards. 


Tuesday, December 12, 2023

Snow globe charcuteries


Happy tuesday!
Last friday I hosted a luncheon that was a gingerbread house themed.
I was wanting to do a charcuterie board but felt that would be a lot of food for smaller group.
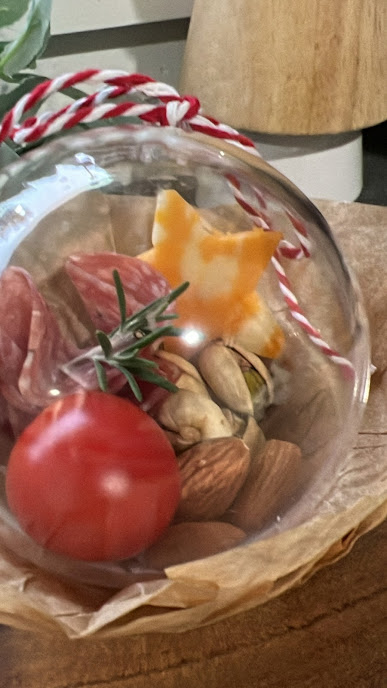
I saw these plastic ornaments filled with nuts and chocolate and thought that might be fun to make them into little charcuterie ornaments.


I started with the empty plastic ornaments and found some of the kraft colored paper cupcake holders to set them in. 


Start by thinking about what you want to put in your ornaments.
I cut up some colby jack cheese into star shapes, (just one per ornament) added some almonds, pistashios's a cherry tomatoe and a few little sprig's of rosemary and two pieces of salami rolled up. 


I didn't have a star cookie cutter so I used my star die cut to carefully cut it out. 


Now time to add all the goodies to the ornament,
start with the star then add the nuts, roll the salami
and add to the sides then tuck the rosemary in and close
the ornament and tie off with some baker's twine. 


It's just enough for one, without wasting all the leftovers
of an entire charcuterie board. 


They turned out so good!


What do you think?


Sunday, December 10, 2023

DIY bridseed feeders


Good sunday morning!
How about a little diy for weekend?
These little bird seed pucks are so cute and easy to make.
I love the look of them being very natural with the added dried orange and cranberries.


Let's get started,
You will need a box of unflavored gelatin, some bird seed, water and muffin tins and some spray oil for the tins. 


Start by spraying your tins and set aside.
Now in a bowl measure 8 cups of seed.
(you can half this recipe if you don't want to make this big of a batch)
Set bowl aside
In another bowl
Measure 1 cup of cool water and add to the bowl with 4 envelopes of the gelatin and stir for 2 minutes so that it dissolves well. 
Let is sit while you take another 1 cup of water and boil it in a pan on the stove.  Once boiling add to the bowl and stir til completely dissolved, should mostly be dissolved already. 
Now add to the bird seed and stir thoroughly until the seeds are fully coated in the gelatin.  Let sit for a minute then stir again. 


The seed will start to get a little heavy looking, 
you can at that point start to scoop the seeds into your tins
with a spoon being sure to fill to the very top of each tin.
Take a straw and gently push down into the seed to make a
hole in the center.
Now here's the hard part, let dry for at least 24 hours before inverting the tins to take them out.  
I did this by putting some wax paper over the top of the tin then gently inverting the pan over some wax paper.  They dry very hard so if yours are somewhat soft turn on the oven at the lowest setting and set on a cookie sheet for about 10 mins and remove and let dry for an hour. 


While you wait your 24 hours for them to dry you can now try a hand at drying cranberries and oranges.  I use my over where as I know many have air fryers that work too.
For the oven method slice your oranges 1/8" thin if you can and arrange on a lined cookie sheet with parchment paper.
Take your fresh cranberries and set them right onto the pan as well and put into the oven at 200 for 2 hours being sure to check the first hour and turn your oranges.  Take them out and let them also harden up over night. 


I also grabbed some fresh rosemary from my yard to add to the feeders.   Get some twine and wrap through the hole of the puck twice tying it off at the top with a knot.
Using a hot glue gun, glue the orange down first with just a little tiny
bit of glue and then the cranberry and rosemary.


They are so cute!
Bag them up and gift them away or store them and hang them in your trees for the winter feeding!
Hope you have fun making these!
Super easy!