Wednesday, August 12, 2020

Getaway


We just celebrated our anniversary by heading to a quaint little Barvarian town called Leavenworth.
We stayed at the Post Hotel
The above photo was our room called 
the "Juliette room" 


This is looking out towards the saltwater swim-out infinity pool.
the hot tub is right ahead.
The hotel offers authenitc wellness concept from the Alps, 
the spa resort features numerous saunas, steam rooms, relaxtion lounges and European hydrotheraphy traditions.  


The spaces throughout the hotel has the most beautiful decor,
my eyes were captivated!


This was the view through out door that looked out on the mountains and river.
This place is a MUST for any celebration or just getaway.
It is the most relaxing I have ever experienced.


More of the decor... bring me all the Antlers!
This is me below (well, part of my leg)
taking a break from the sun to cool off.
This was a treasure of a celebration!
We had such a relaxing time away.....
You must check them out!
The Post Hotel in Leavenworth.

Sunday, August 9, 2020

Home Decor

Good Morning!!
This morning I wanted to share one of the biggest questions I get about my wood bead garland that I make in my Etsy shop.
The biggest question is always, “what do you do with them?” 
Well, today’s post will give you a few little ideas on how you can tuck them throughout your home decor.
The nice things about the garland is that you can buy them in a neutral natural color or I also offer them in custom colors to fit your home decor.
In this picture above one of my clients just laid them right across her books on the coffee table.  Looks great!

You can order any size of the wood bead garland and better yet, ANY custom color to match your home style!
Take a look how you can add them to a wicker basket, just another way to display them.

In this picture one of my customers added to her tray with antler's, a book and metal sphere.   

You can see how this strand was wrapped around this rustic vase. 

This is one of the smaller strands of beads called a tassle strand, how cute is this sitting underneath this pottery candle. 
So many great ideas to decorate your home, and by each different picture you can see they can be added to any type of decor.
                     You can visit my Etsy shop  HERE
Come take a look at the different sizes available and colors to decorate your home.   


Thursday, August 6, 2020

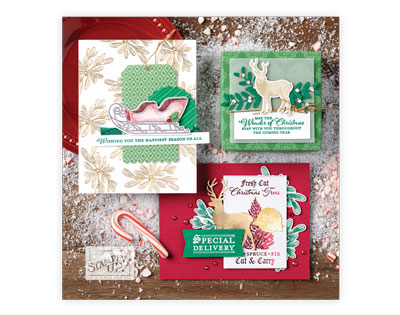
Holiday Mini Catalog


Are you ready to get creative using some new products from the brand new mini holiday catalog?   Get busy with some great new ideas and colors for projects to keep you busy!
Take a look at the video above to get you into what you can be making to gift for the holidays whether it's cards to send or little 3D gifts like the mini coffee cups that are shown. 
                There is something for everyone's ability!
Even pre-made kits that you just have to assemble! 
                  Get your order in so you can join in the fun!


08.01.20_HEADER_AD_CATALOG_GOLIVE_NA

           The ordering period is August 4 2020 - January 4 - 2021

                        Here is the link to view the entire online catalog...
                                              View Catalog HERE

Are you ready to squeal at all the new fun papers, embellishments, colors and pretty ribbon you will be able to create with?  Have fun browsing and when your order to order head on over to the Stampin Up! page to get started!     Happy shopping!

                                            Start Shopping HERE
     
TH_AD_CATALOG_IMAGES

Monday, August 3, 2020

Country Home


Hello!
Happy Monday!
Working on some farmhouse type cards
with the Country Home stamp set.


I used background paper that looks like faux wood.
I stamped the stamp with all the cotton on the outside of 
the cardstock and colored it in with stampin write markers
The pitchers were stamped and filled in with a blending pen and basic gray ink.  
Are you making cards during this pandemic?
Hopefully this card will get you motivated to
make a cards!


Friday, July 31, 2020

Mini Starbuck's Cups


These mini Starbuck's cups are available in the shop
@2340 West Newton
What can you use them for?
I absolutely LOVE when you send me photos of what you use and decorate items from my shop in your lives.
Below you will see one way one of my customers
used the mini Starbuck's cups

She held a Puppiccino party for her lil' pup Izzy
Maybe you know, maybe not, but Starbuck's does
puppiccinos for your dogs when you go thru the drive thru!
She wanted to recreate them for her puppy party and
ordered them from my shop and sent me these pics!


Isn't little Izzy a cutie?
Other ways customers have used the cups are for baby photo shoots,
playhouses for their kiddos, coffee bars and cups filled with treats with a  coffee card.   How fun!
Again, I love seeing the creativity with these cups!
If you like to check them out head over to my Etsy shop
2340westnewton

Wednesday, July 29, 2020

Another "Faux Shiplap Wall


Well, at this point no walls are safe!
I am at it again adding another little sweet spot of a 
shiplap wall to this rather small "Harry Potter" like 
closet we have at our cabin that I've transformed into
this cute little space for people to sleep in.
(yes! people love to sleep in here!)
You can see in the above rather not so good photo
I took of the plain wall.


And here it's all done!
If you missed how I did this technique the post is right 

It is done with a black sharpie!
Yes, you read that right.
If you head over to the post above you can see 
how easily you can transform you space to look
like you installed shiplap.
It truly looks great and I was surprised how
nice it looks.
It really added to this little space making 
the room come together and balance it out. 
I hope you'll find a wall you can try it out on.
(also,  I have had many questions as to whether 
my walls are textured.  They are, and the sharpie
glides right over it just fine)

Monday, July 27, 2020

Faux Shiplap


It's been a few days since I've posted.
We decided to head over to the mountains for a few days
and just take it easy while working remote.
I decided to try my hand on this wall with what's
called "faux shiplap"
What is it?
Well, simply put, using a black sharpie and 
drawing lines directly onto your walls!
The wall above is the wall I decided to try it on.

NOTE:
If you would like to see the video on how to do this easy technique 
"faux shiplap" head over to my instagram account which you can 
visit via my blog home page.
My handle is - julieannepitta
Go to my highlights and under "faux shiplap" is the video
on step by step instructions.


What you need is a black sharpie,
a piece of cardboard cut at 6" x 8"
a pencil
a long level 
and some of the existing paint of the color
of your existing wall for touch ups.


Start at the top of your wall using the cardboard
piece that you cut at 6" x 8".
Holding the cardboard to the wall, and using your pencil, mark
the wall every 6" all the way down to the bottom of the wall.


Once done marking, take your long level and sharpie,
make sure that you look in the bubble in the center
of the level to be sure your line will be straight, hold the
level in place with one hand while you lightly draw a black
line all the way across the wall to the end of the level.
If your wall is longer than the level then you will continue
the same line continuing where you left off.


You can see how I am holding my level, making sure to put
pressure on it so it doesn't slip while I draw my line. 


Here it is all done and boy I wish you could see it in person 
because I tell you, it seriously looks like I put up real shiplap!
The results are stunning and I have to say I just may have done 
a few more walls.   No walls are safe!


Here are a few more shots of the space I "shiplaped"
Stay tuned for me to show you where else I did this.
I hope you give this a try! If you find you don't like it,
 you can always just paint over it.

One thing to share, one of my lines just didn't look good to me, so I painted over it and redid it. 
Don't be afraid if you have a slip of the pen or a line that doesn't look like you would have liked. 
  Take your existing wall paint color
and  a small brush and paint over your errors if any.
  Easy to fix!
Have fun!  I hope you try this!