Thursday, March 31, 2011

Bunny Cage


Good morning!  Here is a cute little bunny cage I put together.  I started with these tiny little chocolate bunnies
I found at Target.  They are the Lindt bunnies.  Not very big at all they are all of  1 3/4' high.
Next I took out the Big Shot Die Box #2 and punched it out in Sahara Sand.   Take your 1 3/4 square punch and punch into the center front of the box to make the window.  Then take the Sahara Sand ink pad and stamp with the stamp Well Worn on the outside to make it look like wood.  You could also use the Woodgrain stamp as well.
Move down for more details......


Here it is completed.......


Now look close at the window,  it is a piece of transperancy that I stamped with Black Staz on ink with a Chicken Wire stamp!
Now the little bunny is sitting in his cage.   Add some grass and a flower,  (the flower is the Birds and Blooms Die with a gold brad.   Isn't  it sooo cute!  I hope you make one!  xoxo


Here is what you need:

Cardstock:  Sahara Sand #121043, Real Red# 102482,  Brushed Gold # 102935, Very Vanilla #101650
Ink:  Sahara Sant #105208, Basic Black #101179, Staz on Black #101406
Accessories:  Big Shot Die Box #2 #114518, Bird and Blooms # 113485
Stamp Set:  A Good Egg, Well worn

Tuesday, March 29, 2011

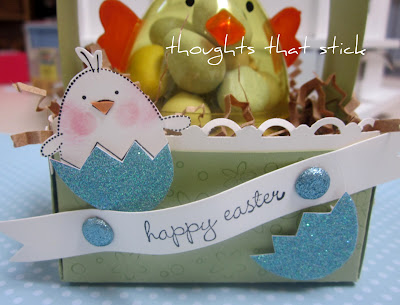
A tisket a tasket......


A little Easter basket!  I found these cute little chickies in the dollar spot at Target.  You get two for a buck, quite a deal.
I filled it with the Cadbury chocolate eggs.  The chickie reminds me of the chick in the stamp set  A Good Egg so I had to get it out and play.   My stampin buddy Kirstin came by last wednesday and brought this template for us to try.  It is a box that can easily be made into a Easter basket.  Thank you Kirstin!
To make the box you will need to cut a 6 x 6 piece of cardstock and score on all sides at 1 1/2'.  Cut in the sides to make the box and assemble.   Soooo Easy.!  Now add the handle.   I used 1/2' x 7'  Then decorate.  Here it is......


Cardstock:  Pear Pizzaz, Very Vanilla, Marine Mist (with Dazzling Diamonds)
Ink: Basic Black Pretty in  Pink (for cheeks)  Pumpkin pie (for beak)
Accessories: Glimmer Brads (Subtles) #121004
Stamp Set:  A Good Egg  #114974


Monday, March 28, 2011

FREE FREE FREEE!!!!

Yes you are reading this right!  How you would like free projects I have made?  Everything from cards to 3d items?
Well here is your chance!  This is the last week of our Stampin Up! Sale A Bration and for the first  7 customers who order $50.00 or more you will recieve not only the free Stampin up free products you will be recieving up to 50 cards and or projects that you have seen featured on my blog!  WOW! you say?  yes below are just a few things I have showcased, but if you visit me often you know there is more and they are all up for grabs!  So place your order now as it will be the first lucky 7 that will recieve the samples! 

View catalog   HERE

View Sale A Bration Catalog   HERE

Place Order HERE

Thursday, March 24, 2011

Mr and Mrs. Cottontail


HI Stampers!  Today's post is Mr and Mrs. Cottontail/ The box I used to create them are is the  Big Shot Bag with Scallops Die. It is all one piece and very easy to assemble.


The girl's dress is made with the Springtime Vintage DSP # 121782
Assccessories:  Large Oval Punch #119855
Small Oval Punch   # 119683
Adornments (Roses)  # 121879
Vintage Trinkets ( Buttons on vest) #118764
Gogglie Eyes, Pom Poms` 
   Big Shot Bag with Scallops Die ( can be found in the 2009-2010 idea book)

I filled them with these sooo cute chocolate Bliss  bunnies,  they fit perfectly in the Bag with Scallops die and besides, chocolate Bliss is the BOMB!   Yumo!  


Don't forget to add the pom poms to their hinnies!  xoxo

Wednesday, March 23, 2011

Chickie Poo card


Hi Friends!  I just can't seem to get back on track!  today's card is a cute Easter chickie card.  It is a tri-fold card
so the dimensions are 5 1/2 x 12, score at 4' and 8' and fold.  Once folded you will measure across the card, at the 1 and 3' inch line, take a pencil and lightly draw a line across.  You will follow this line while punching out the 1 1/4' square punch.  That is how you achive the window in the center.  Punch through only the first two folds leaving the last one for the inside of the card to write in.   The chickies are just stamped on Whisper white cardstock cut out and I added glitter to the Daffodil delight paper.  You then attach them to the backside of the window. (see last photo)  Hope you like it!  xoxo


Cardstock - Pear Pizzaz, DSP Soft Subtles, Daffoldil Delight, Whisper White
Ink: Basic Black, Pumpkin Pie
Stamp Sets- A Good Egg, Easter Blossoms
Accessories:  Dazzling Diamonds Glitter, Decorative Label Punch, Glimmer Brads Subtles


Sunday, March 20, 2011

Friends 24/7


Been under the weather all week and just got a little energy to stamp a card today, 
This is the Friends 24/7 set.
Cardstock:  Crumb Cake, Soft Suede, Whisper White, Daffodil Delight
Ink: Soft Suede, River Rock
Accessories:  Tiny Tag Punch,Vintage Trinkets, Scallop Punch Big Shot Top Note Die, Dazzling Diamonds,
Pretties Kit half Pearls  xoxo

Tuesday, March 15, 2011

Baroque Motifs


Here's a stamp set that needed to get dusted off!  We tend to foget the good ole' ones.
Stamp Set:  Baroque Motifs  # 113490, Afterthoughts 113388, Sanded #109294
Cardstock: Soft Suede, Confetti White, Poppy Parade, DSP So Saffron
Ink:  Soft Suede, Poppy Parade
Accessories:  5 Petal Punch, Vintage Trinkets


Sunday, March 13, 2011

Just Believe


Spring is just around the corner!  This card has all pastels colors in it.
Cardstock:  Pear Pizzaz, Baja Breeze, Whisper White, Pretty in Pink
Ink:  Pretty in Pink, Pear Pizzaz, Daffodil Delight, So Saffron,
Baja Breeze
Stamp Set:  Just Believe
Accessories:  Beautiful Wings Embosslit, Rhinestones, Satin Pretty in Pink Ribbon


Feeling the Love......


has awarded me the Stylish Blog award!  Thank you so much for the honor!  Skoot on over and visit her blog she has some really great ideas!  Thank you Jenn!

Friday, March 11, 2011

Romantic Ruffle T shirt


Here's a fun  t shirt I made this past weekend.  A fellow demonstrator Noel Culbertson showed how to do this.  Here is what you need to start with.  Buy two of the same t shirts.  Preferably some really cheap ones.


I started with two yellow t shirts.....


take one of the shirts and cut it in half....


using the shirt you cut in half start by cutying 2 pieces  1 1/4 x 12 and and sew them together at the small ends so that you have one long piece.  Then cut   6 pieces 2  1/4 x  6.  I used a rotary cutter to get straight lines. .


start with the two pieces that are 1 /1/4 x12,  take and sew on your sewing machine
a straight stitch all the way down.  Take one of the threads and pull to gather the material.
Once all gathered you then will pin it to the shirt starting in the back of the shirt to the front.
Leave a 4 in opening to add the first ruffle.  Take all 6 pieces and run a stitch throught them and gather all six pieces like you see in my picture.  Start pinning them and then sew them all on the shirt. You should be done!


Here it is all done!  Sooo cute!  xoxo
\


Wednesday, March 9, 2011

March Paper Crafters Sampler Available!


Ladies this month's Paper Crafters Sampler for March 2011 is ready!
to order your copy now!   Spring Reverie!
 So head on over to the PCS website and help welcome this long awaited season... I'll meet you there! Remember to use code PCSJP when subscribing, or just mention my name.


Here is a sneak peek at my project available!  Now come on over!  xoxo

Monday, March 7, 2011

Easter Beaster


A little early Easter motivation.  On this card I used some really muted colors. 
Cardstock:  DSP Blushing Bride, Soft Suede, River Rock, Blushing Bride, Whisper White
Stamp Set:  Easter Blossoms
Ink: Soft Suede
Accessoires:  Antique Safety Pins, Three flower punch, River Rock Ribbon, Scallop Punch, 1/16 punch, Linen thread


Sunday, March 6, 2011

Take 4 on the Nature Walk Fabu Five


But first a big shout out to Becky over at   http://www.scrapjunkie-becky.blogspot.com/  she was so kind in leaving me the nicest compliment and the Stylish Award!  Thank you for the honors Becky!  Go on over and check her creations out as well! 
Next up I said it was take 4 of Nature Walk but it is really take 5!  I really posted 1 and 2 on day one!  So here it goes!


Stamp Set:  Nature Walk, Sanded
Cardstock:  DSP Newsprint, Early Espresso, Very Vanilla, Old Olive, Baja Breeze
Ink:   Early Espresso, Old Olive, Marina Mist
Accessories:  Baja Breeze Sem Binding Ribbon, Dazzling Diamonds Glitter, Sponge Daubers


Friday, March 4, 2011

Take 3 on Nature Walk Fabulous Five


Item number 3 of the Nature Walk Fabulous Five!  I have used the Big Shot Box #2 - #114518
to make this cut little box filled with light blue jelly beans.  The DSP paper wrapped around the box is the Botanical Gazette
paper.  I punched out a  3/4' circle and used a sponge dauber and Marina Mist ink to shade the circle..   The whole boxed is stamped with the extra large background stamp called Sanded with Early Espresso ink.   The closure for the box is the Vintage Brads. 


Thursday, March 3, 2011

Take 2 ... Nature Walk Fabulous Five


Day two and card two of the Nature Walk Fabulous Five..... 
Stamp Set: Nature Walk, Your a Gem
Cardstock: Old Olive, Marina Mist, Whisper White
Ink:  Old Olive, So Saffron, Basic Black, Early Espresso, Marina Mist
Accessories:  So Saffron Grosgrain, Mini Saftey Pins, Dazzling Diamonds, sponge daubers
3/4 circle punch  xoxo


Wednesday, March 2, 2011

Taking a Walk with Nature


If you have been following my blog for very long you know that I used to have my Fabulous Five every month.. What that means is that each month I take a stamp set and try and stamp at least 5 things with the set.   Today  I wll begin to share with you over the next few days all five things I made with the Nature Walk stamp set from the Occassions Mini catalog.
Above here is the envelope that I made for the card to go into.  The botton half of the envelope is corrugated.  I began by closing off the envelope and then cutting the top off at 2 inches.  That way once I was ready to slide it over the top it will fit snuggly.  By cutting out the bird and putting it  inside the circle it becomes the closure for the envelope.


Here is the card inside of the envelope.  It is made with the new DSP Botanical Gazette, Chocolate Chip and So Saffron.
The images are stamped and then punched out with the 1 1/4' circle punch.  I shaded around the circles with Sahara sand
ink to give the card a stone look..  The stamp set is Nature Walk.   Tomorrow I will post card #2 from my Fabulous Five!
Hope you enjoy them!  xoxo