Thursday, October 31, 2019

Happy Halloween!


It's our first Halloween in our home!
And..... I am missing it.   I had to fly to Texas
for a wedding I will be decorating for as well as be
the Wedding coordinator for.  So looking forward to it,
but boy am I going to miss all those littles coming to 
the door!


He's all ready for fright night!
What do you call a fat pumpkin?
a Plumpkin!  muuuwahhhhh!


Think I need to call ghostbusters?


At our old house we always had green 
lights in the front windows with shilouettes.
This house we used a spare room to create the
bats in the green room.
Do you have halloween traditions for decorating each year?

Monday, October 28, 2019

Deer Antlers


You're wondering what the heck?!!!
I was shopping Hobby Lobby last week and found a box of these heavy plastic antlers in the Christmas ornament section.
They were on sale 50% off making them $4.99 for a box of 4.
They measure about 7" long, meant to be ornaments, but I decided to alter them so I can use them for Thanksgiving and Christmas decor.


Once you take them out of the box they are a goldtone lightly glittered.  I used my sanding block to remove as much of the glitter as I could.  I know for many of you the gold would be fine, but I want the antlers to be white. 
So begin to lightly sand the antlers.


I used Krylon colormax in flat white to cover them,
took only two coats.
Once they were dry I cut off the ropes.


They turned out great!
I was playing around with them in this wood tray I have, 
but most likely will run them along my Thanksgiving table with some greens, white pumpkins and little votive candles.


Not too bad!
Love how they look in the tray too!
Your monday morning alter!

Saturday, October 26, 2019

Winter Woods


Well I almost forgot to post the second Paper Pumpkin redo
for the Winter Woods kit.
This one I changed up by making it very simple.
The original card is very detailed.


I really like things simple, for this card I just added some dazzling diamonds glitter, some gold twine and the cute hearts on top of the tree.  That's it!
You can view the Paper Pumpkin Winter woods video
in my post from a few days ago to see how
to put your kit together. 
Such gorgeous cards to make for Christmas. 

Thursday, October 24, 2019

WIT Cellars creative night


I am pleased to announce another fun filled evening at WIT
Cellars for a night of wine and creativity.
Here are a few of the projects you will be making.
If you are local and would like to join in,
message me your reservation at
juliepitta@rocketmail.com 
The date is thursday, November 14th
6:30-8:30pm 
Cost is $40.00 per person which will include your wine
and projects. 


We will be making a few more items as well so come join in
on the fun!  
Looking forward to it!


Tuesday, October 22, 2019

Winter Woods: October 2019


                      Come check out the new October paper pumpkin
                                               Winter Woods
                Watch the video above if you received your kit in the
mail and want follow along with how to put your cards together.


Here are some of the pieces of the kit.
Look at the beautiful tree cards, and the 
birch tree overlays.


As always, I shook things up a bit starting off with
the trees card.  I will post what I did with it next, but
first I will show you what I did with the very detailed
birch wood overlays.


These white overlays are already cut and ready for 
you to layer over any cardstock.
I used some retired faux wood paper.
I punched out a 1 3/4" circle for a winter moon. 
The paper comes all glittery, but I decided to add
just a little bit more on the moon and the edge of the snow.


I ended up backing the faux wood paper on top
of Baja Breeze cardstock to finish the card off.
Did you get this month's kit?
If you are interested in Paper pumpkin 
you can sign up for one month or more...
you pick!
Head HERE


Sunday, October 20, 2019

Wood Bead Garland


Are you looking for a gift or a special piece to add to your decor?
These wood bead garlands can be used all over your home decor and goes great with any type of decor.
You can also customize our color choice, choose from the colors
you see or order a special color from me. 


The long garland are 30" long, this is the Christmas red.
The smaller garland are to be used around a vase or bottle or on your pumpkins be it real or artificial.


You can either message me with your order or go right to
the shop to place your order.
Holidays are a comin'!
Shop HERE

Friday, October 18, 2019

Halloween Treats


Muuuwaaaahhhh!
How about some cute treats for you to try this weekend.
The great thing about this diy craft is you can use and up cycle 
your paper towel or tissue holders to make these.


Starting with some designer paper, the one below is the new 
Stampin Up! paper called Monster Bash
#150447 for $11.50


I started by cutting the rolls at 5" high.
Measure your paper to fit by height and length, once cut
using an adhesive attach it to your paper roll.
Look up close how detailed this paper is!
I love all the details!


To create the bottom of the treat holder punch out a 1 3/4" scallop punch and using a glue gun run some glue along the bottom of the roll and then attach the scallop circle.


To make the handle cut yourself a 1/2" piece of cardstock
using some adhesive attach to both sides of the inside of the treat holder.   That's it!  fill er' up with some treats and gift away!


Wednesday, October 16, 2019

Pumpkin Walk


Well this certainly was a first!
We hopped on the Seattle ferry to Bainbridge Island to see the 
26th (who knew??) annual pumpkin walk held at the Bainbridge Island Gardens.
Above is before it turned dark out.....


and this is after waiting for 45 minutes in a line about a mile long!
Well worth the wait!
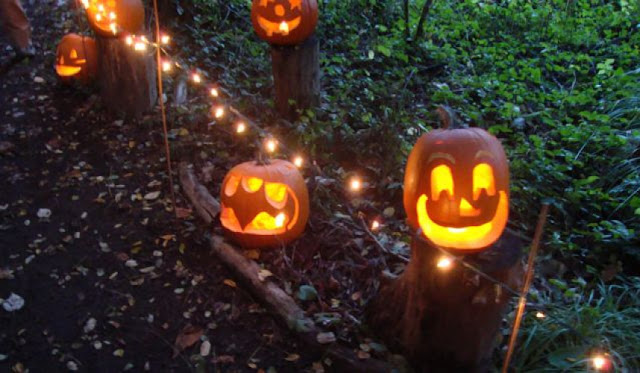
As you start through the arbor you begin a magical lighted trail that is lined with over 300 lit pumpkins!
Just pure magic!


Terri and I taking in the ferry ride


These photos show the trail  a bit better,
every pumpkin and detail was cleverly carved....


Here are a few more.....
this little adventure turned out to be so fun and
by the way it was FREE! even better!
You can also join in by carving a pumpkin and donating it 
to the walk... 
Love this!


Monday, October 14, 2019

Witches Hats


I love to have treat bags on hand to give to friends and visitors
Showing you again these cute little mini witches hats that you can make ahead of time to attach to just about any halloween treat or gift you like!


These are some really cute polka dot bags that I had, filled them up with goodies and attached the witches hats.


These are little fry boxes I made and filled with treats and a little saying topped off with the hats.
You can view how to make them HERE


Sunday, October 13, 2019

Lollipop Ghosts


Went to visit the kids at Ronald McDonald house thursday night and here is the cute craft I made with them with Halloween coming up.
These cute little ghost are easy to make and what a great idea for the kid's classroom!


Here's what you need;
Lollipops, kleenex some baker's twine and googlie eyes
Take the tissue and put it over the top of the sucker and tie it off in the middle into a bow.  Now choose what type of googlie eyes you want, using glue dots put them on your ghost.
That's it!
Your done!

Saturday, October 12, 2019

Halloween Decor


Are you getting ready for Halloween?
This is my first Halloween in our house since we moved here almost a year ago.  It's funny how we get into habits of decorating the same every year for a holiday.
I have to admit, it has been hard to wrap my mind around changing things up.  Not sure why, but as much as I love to do decor it just wasn't coming to me right away here in our home.
I decided last year when we moved and downsized and purged that I wouldn't be buying new things so I have only used what I had on hand.   For the mantle above I hand cut out those bats by finding a line art image online to trace. 
Went to bed one night and the next morning bats had arrived!
Muuuuuwaaaahhhhh!


This is a great entry piece I picked up as I have had a dresser in my entrance most of the year.   It's a very heavy solid piece of furniture and though I love the shelves down below I have yet to put in anything on them.
All the pumpkins on the top were made last year.  I showed how to make these from pumpkins purchased at the Dollar Tree and also held a class on how to make them.  As long as you have storage for them, they hold up nicely. 
You can see how to make them HERE


More of the diy pumpkins in this wooden tray.
The little soft white material ones are from the Target 
dollar spot.   They have them again this year in all different colors.


And well I just had to share the gorgeous fiery red leaves I drove past on my way to Home Depot the other day.  Such beauty
I hope you have a wonderful weekend doing something you love!